Introduction

Easy eSign is a HubSpot integration that allows you to generate, send, track, and manage e-signature documents directly from your HubSpot CRM records such as Deals, Contacts, and Companies.

Instead of manually downloading documents, filling them, uploading them to PandaDoc or DocuSign, and tracking them separately, Easy eSign automates the entire workflow by:

  • Pulling data directly from HubSpot records
  • Automatically filling your document templates
  • Sending documents to recipients for signature
  • Tracking document status in real time
  • Keeping all document history organized in one place

Easy eSign works as a bridge between HubSpot and your e-signature platform (PandaDoc, DocuSign, and soon HelloSign/Dropbox Sign), allowing your sales, operations, and legal teams to work faster, reduce manual errors, and close deals more efficiently.


Who should use Easy eSign?

  • Sales teams sending proposals, agreements, and contracts
  • Operations teams handling onboarding documents
  • Legal or admin teams managing approvals and signatures
  • Any HubSpot user who wants to automate document workflows

Once configured, Easy eSign becomes a native part of your HubSpot workflow, allowing you to send documents without leaving your CRM.

Requirements

Before you begin using Easy eSign, please make sure you have the following:

  • Easy eSign account: You must have an active Easy eSign account.
  • An active Easy eSign plan: You need to purchase any Easy eSign plan to use the integration.
  • A HubSpot account: You must have access to a HubSpot account where you can install apps and customize records.
  • A supported e-signature platform account: Currently supported:
    • PandaDoc
    • DocuSign
    • HelloSign / Dropbox Sign (Coming Soon)

Important: Make sure you have admin or sufficient permissions in HubSpot to install apps and modify record layouts.

Features

Easy eSign is designed to fully automate your document workflow between HubSpot and your e-signature platform. Key features include:

  • Seamless integration with PandaDoc and DocuSign (HelloSign/Dropbox Sign coming soon).
  • Generate documents directly from HubSpot Deals, Contacts, and Companies.
  • Automatic data mapping from HubSpot properties into document templates.
  • Support for HubSpot custom properties and custom objects.
  • Create documents using templates or by uploading files.
  • Send documents for signature with a single click from HubSpot.
  • Track document status in real time (Draft, Sent, Viewed, Signed, Completed, Cancelled).
  • Maintain a complete document history and audit trail inside Easy eSign.
  • Link documents automatically to HubSpot records (such as Deals).
  • Reduce manual work, copy-paste errors, and turnaround time.

Getting Started

This section will guide you through the complete onboarding process from creating your Easy eSign account to installing the app in HubSpot and preparing it for use.

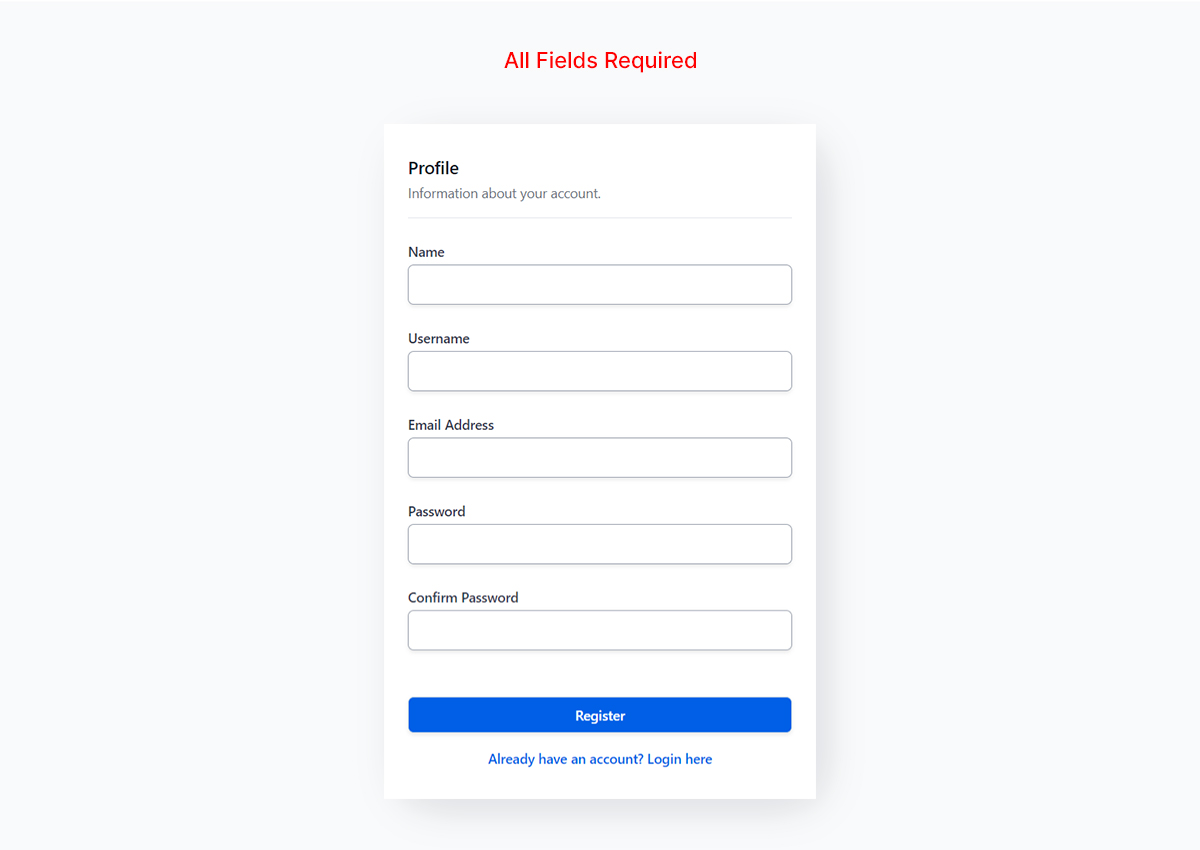
  • Step 1: Create or Sign In to Your Easy eSign Account

    Visit Easy eSign and either Create a new account or Sign in using your existing account or .
    After successful login, you will be redirected to your Easy eSign dashboard. signup
  • Step 2: Access the Dashboard

    The dashboard is your central control panel where you can:
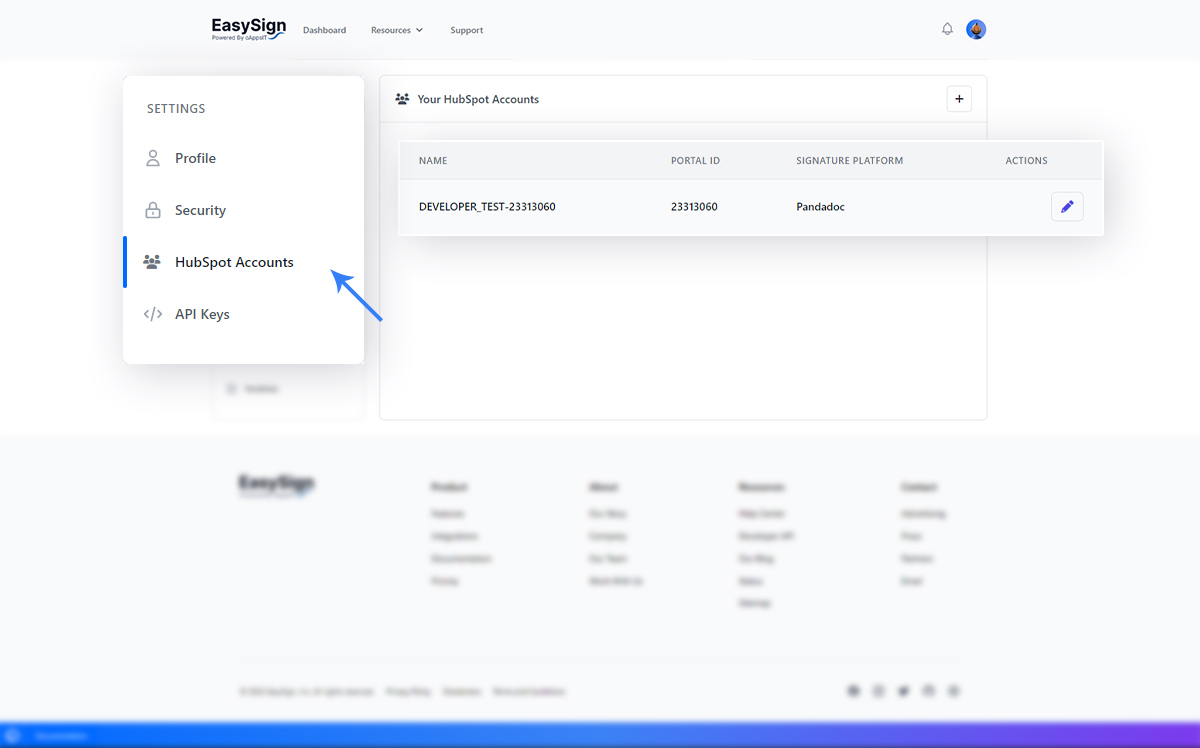
    • Connect HubSpot
    • Configure your e-signature platform
    • View all documents and their statuses
    dashboard
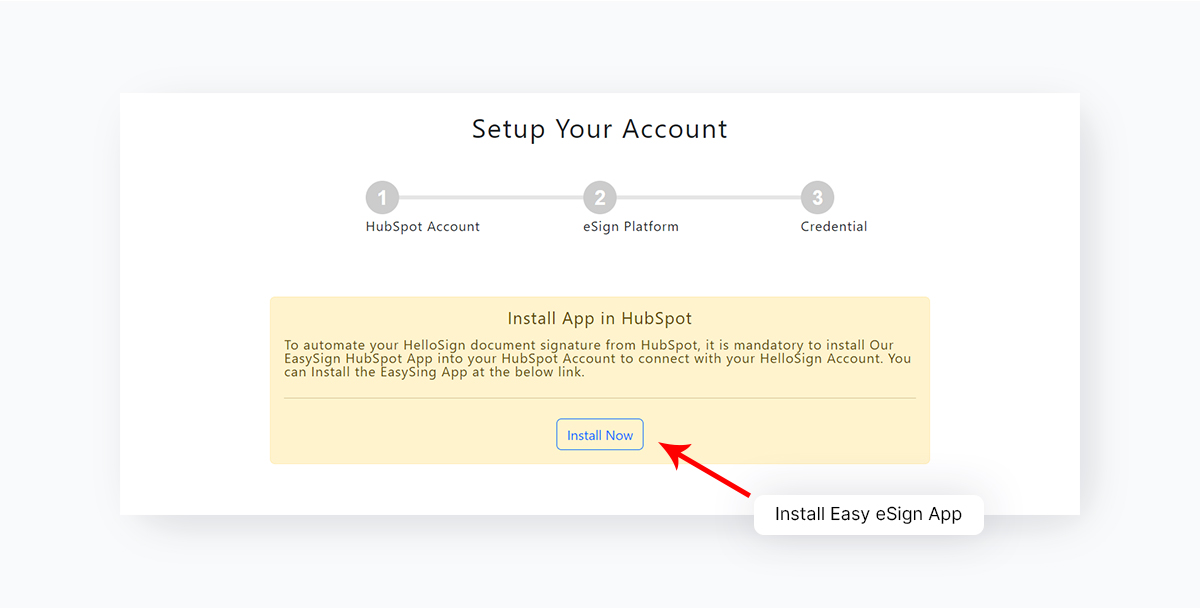
  • Step 3: Install Easy eSign in HubSpot

    Click the Install Now button. You will be redirected to HubSpot to select the account where you want to install Easy eSign.
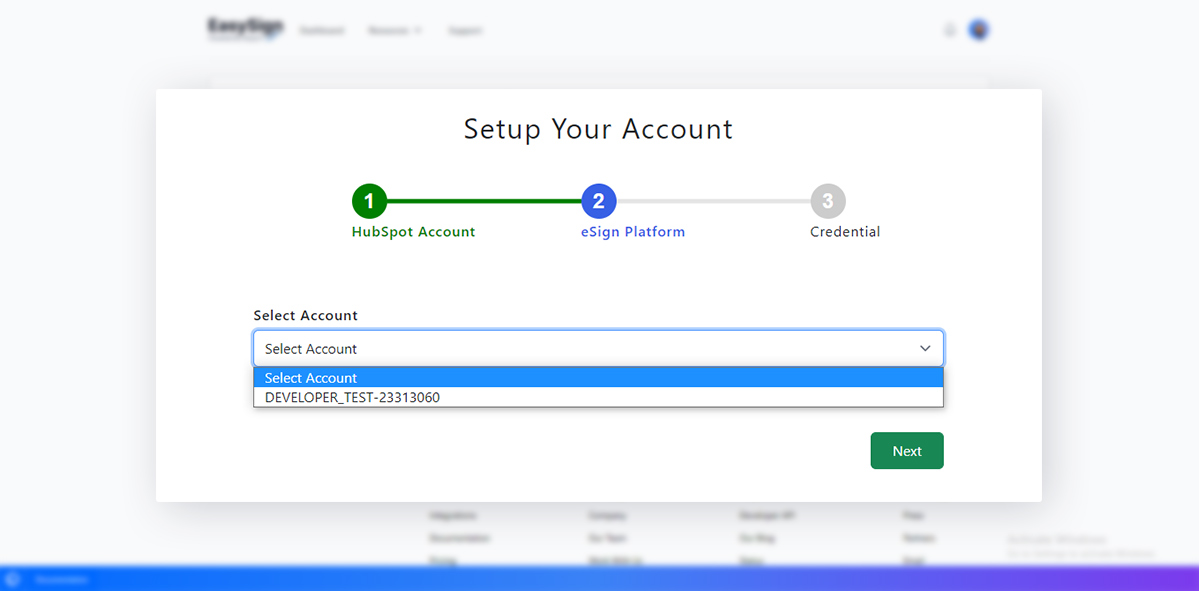
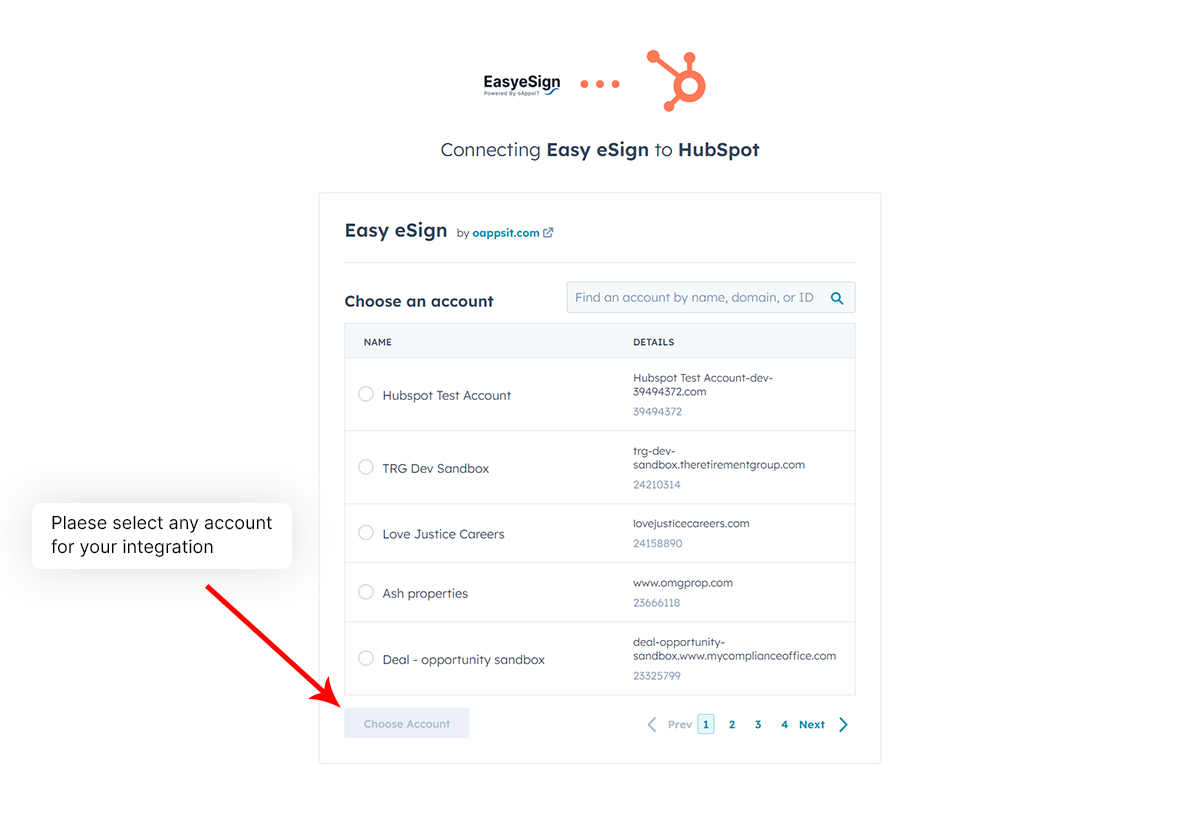
  • Step 4: Select HubSpot Account

    Choose the correct HubSpot account and continue. select hubspot Account
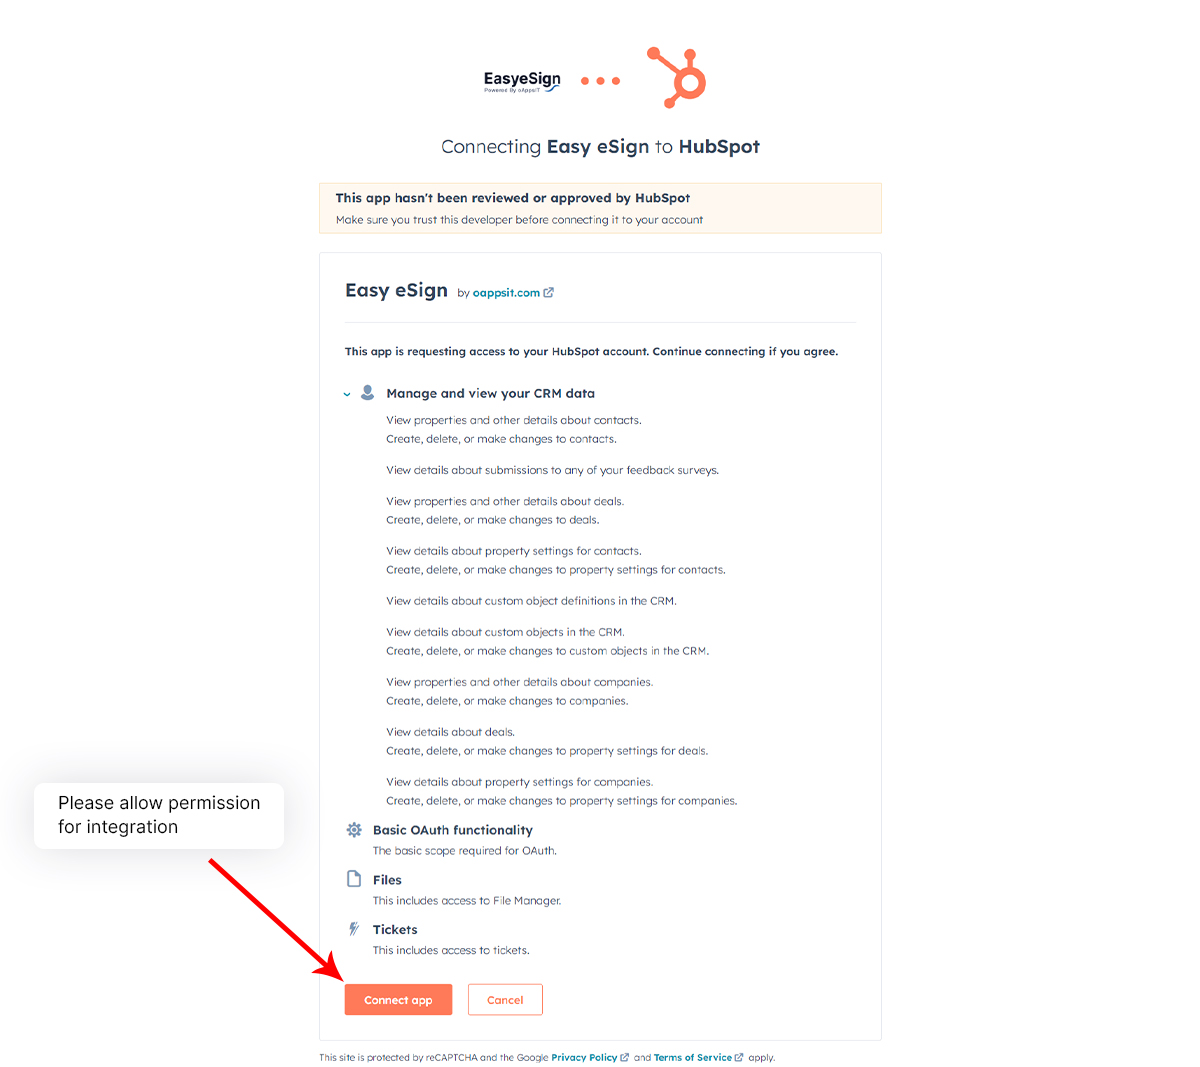
  • Step 5: Grant Permissions

    Click Choose Account to grant Easy eSign permission to access your HubSpot data.

    These permissions are required to:
    • Read Deals, Contacts, Companies, and custom objects
    • Create and update document records
    • Display the Easy eSign card inside HubSpot
    Allow Permission
  • Step 6: Return to Easy eSign

    After successful installation, you will be redirected back to Easy eSign to continue configuration of your signature platform.

Configuration

Configuration is a one-time process where you connect Easy eSign with your HubSpot account and your preferred e-signature platform (PandaDoc, DocuSign, or HelloSign/Dropbox Sign).


Once configuration is completed:

  • Your templates will be accessible inside Easy eSign
  • HubSpot properties will be available as tokens/fields
  • You will be able to send documents directly from HubSpot records

How the Integration Works

The data flow works like this:

  1. You open a Deal, Contact, or Company in HubSpot
  2. You click Send Document from the Easy eSign card
  3. You select a template
  4. Easy eSign pulls data from HubSpot and fills the template
  5. The document is created in your signature platform and sent for signing
  6. Status updates are synced back to Easy eSign
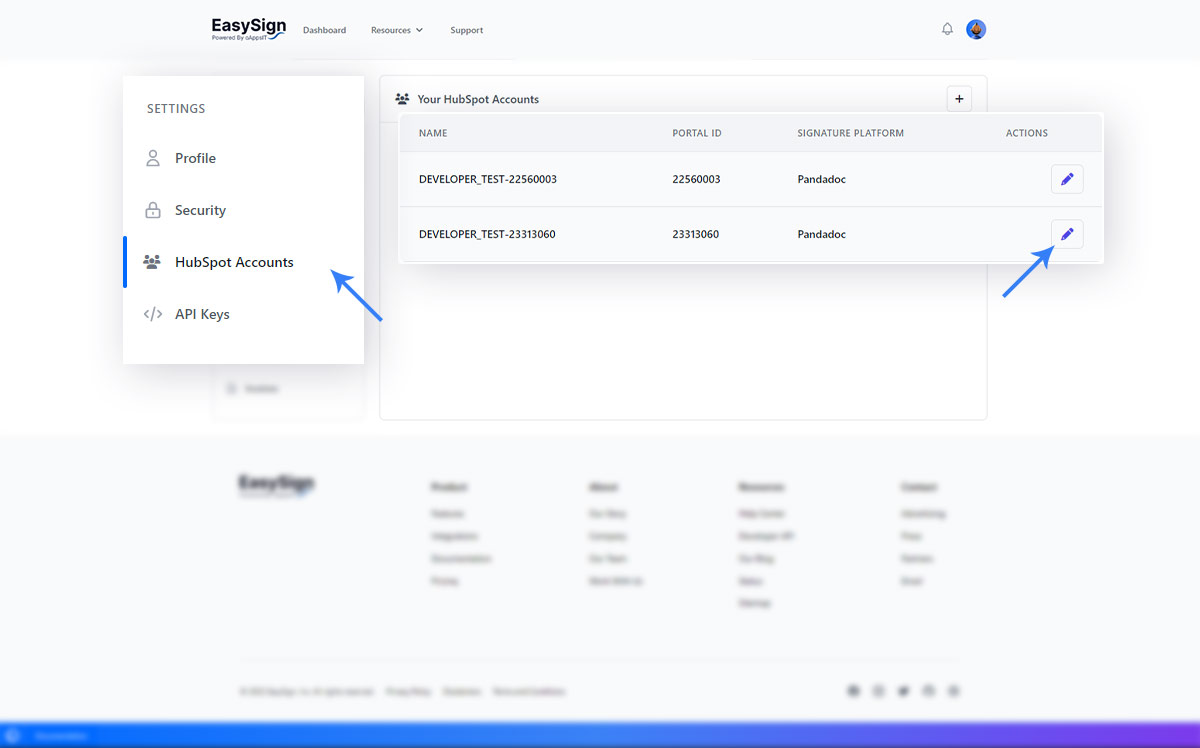
  • Step 1: Select HubSpot Account
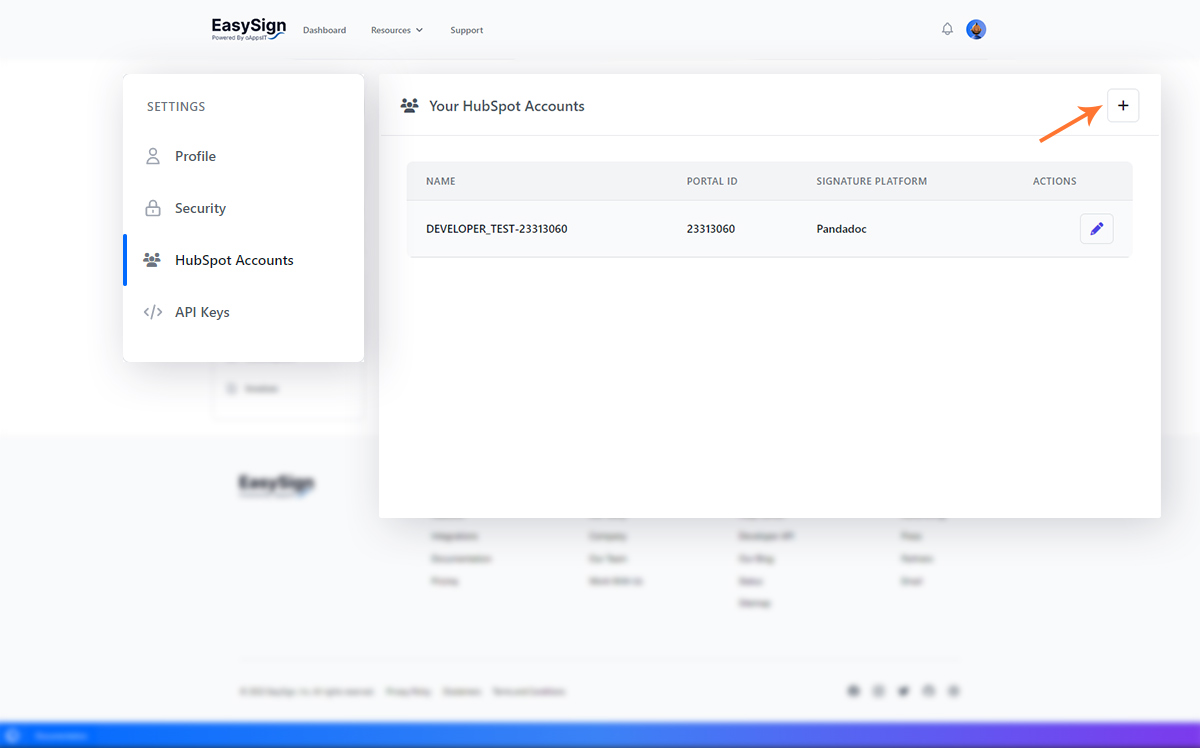
    After returning from HubSpot installation, select your connected HubSpot account and click Next. Setup Account Step
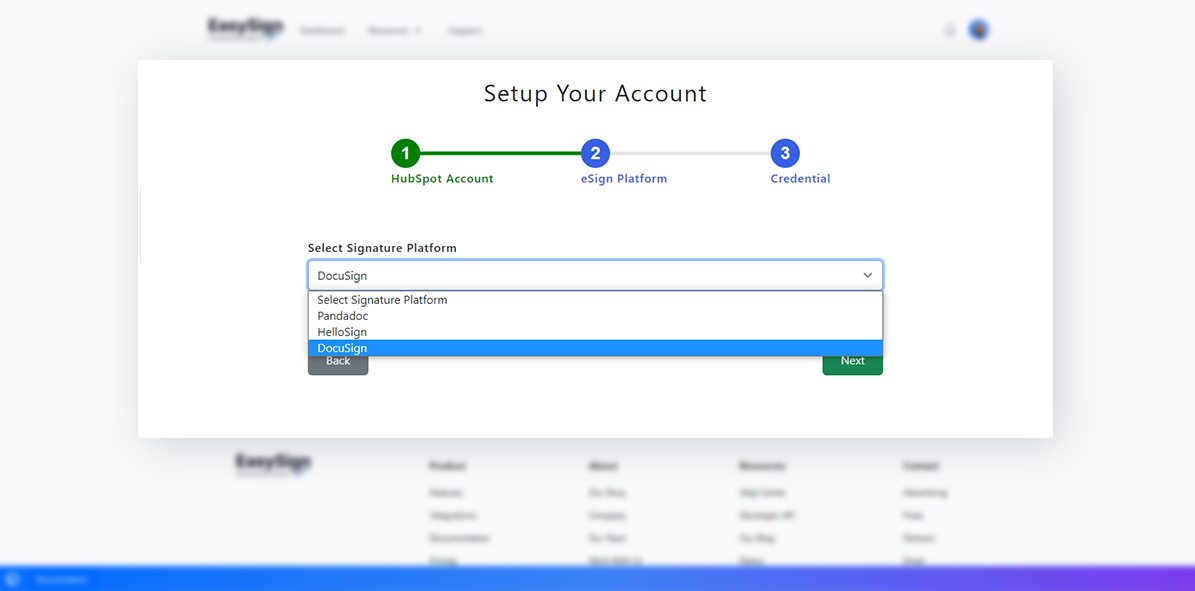
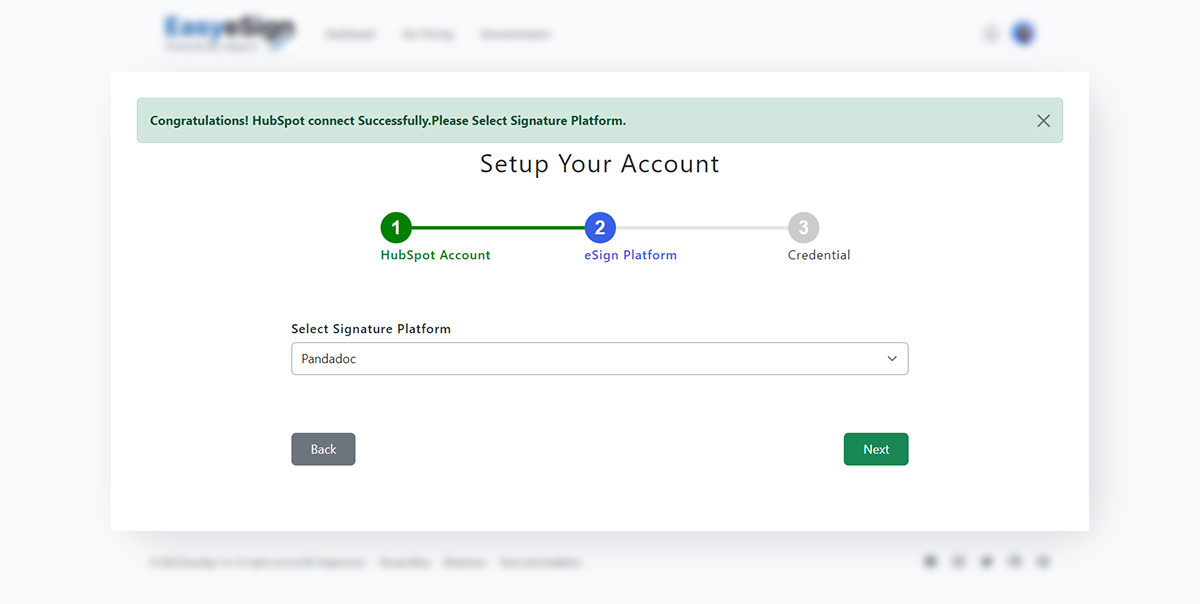
  • Step 2: Select Signature Platform
    Choose which platform you want to use:
    • PandaDoc
    • DocuSign
    • HelloSign / Dropbox Sign (Coming Soon)
    Platform-Integration
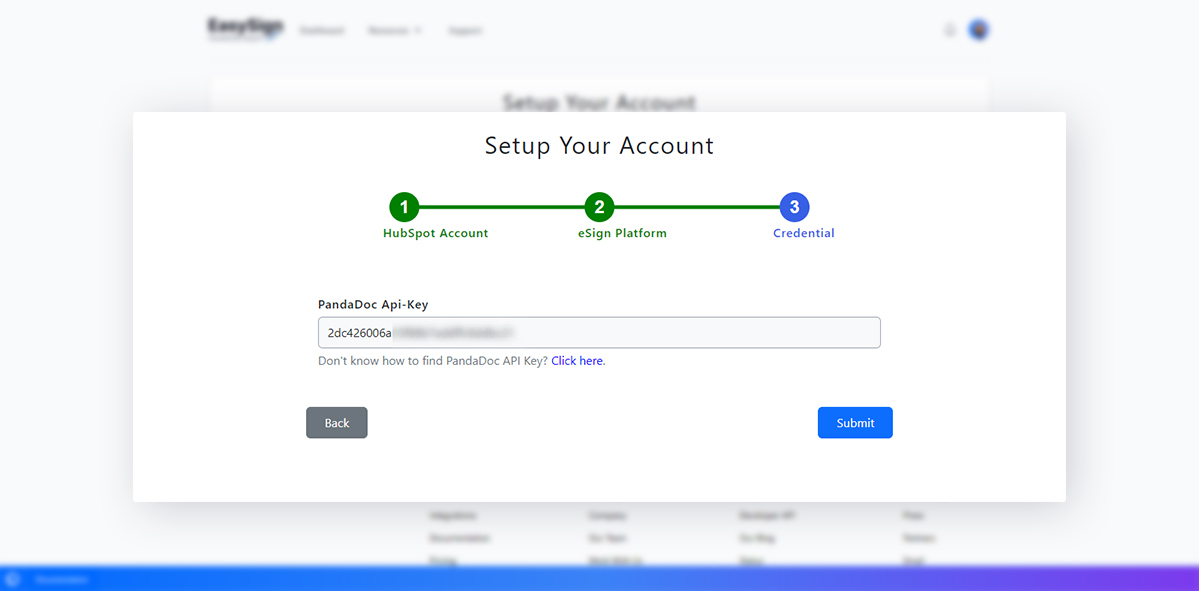
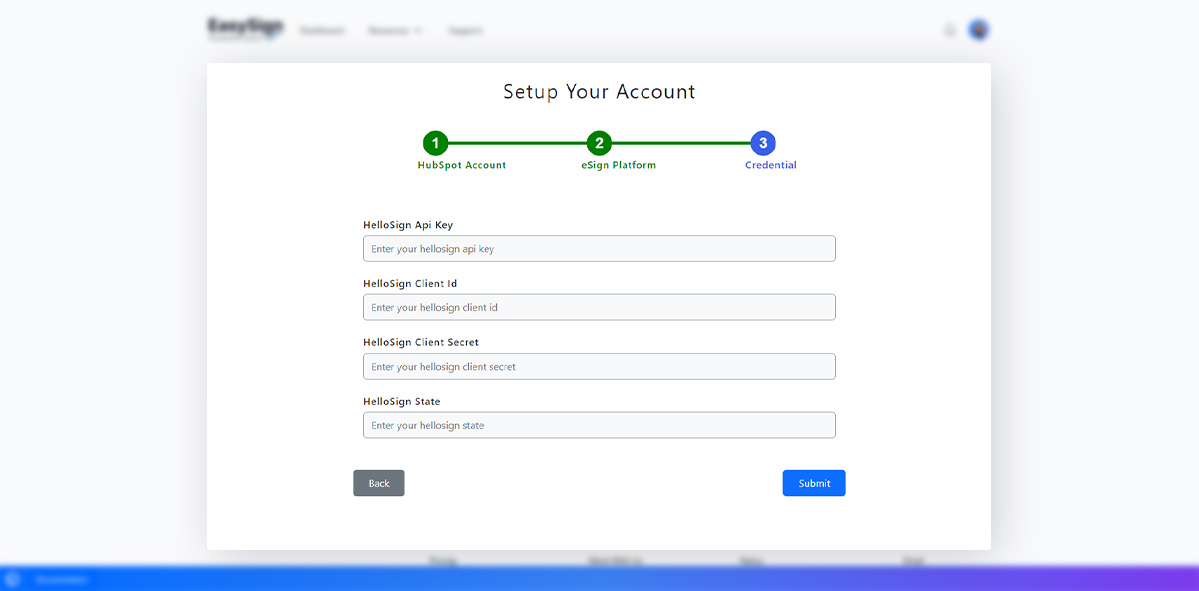
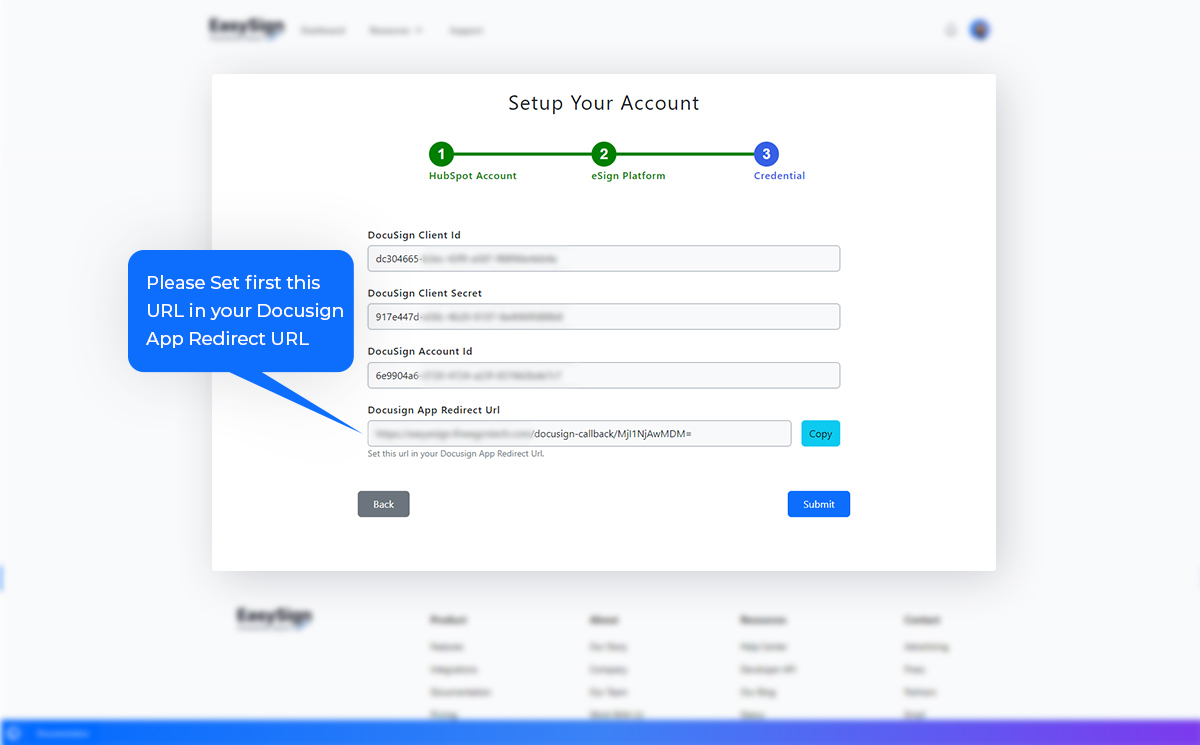
  • Step 3: Enter Platform Credentials
    Depending on the selected platform, you will be asked to enter API keys and authentication details.

    Detailed setup guides:

    PandaDoc

    Click here to configure PandaDoc Integration

    Pandadoc-Integration

    DocuSign

    Click here to configure DocuSign Integration

    Docusign-Integration

    HelloSign / Dropbox Sign Coming Soon

    Click here to configure HelloSign/Dropbox Sign Integration

    Hellosign-Integration
  • Step 4: Complete Setup
    After filling all required details, click Submit. If everything is correct, your integration will be activated and you can start sending documents from HubSpot. Integration-Success

Documents

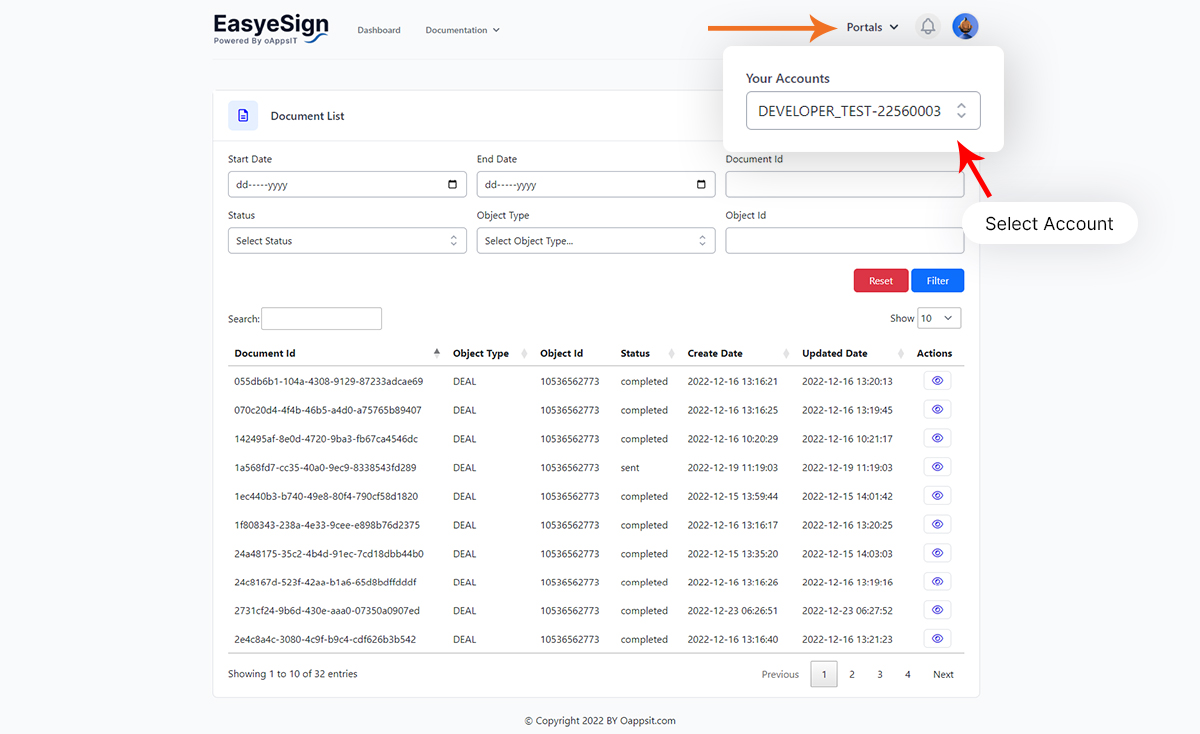
The Documents section is your central place to manage, track, and monitor all documents created using Easy eSign. From here, you can see the complete history of every document generated from HubSpot.

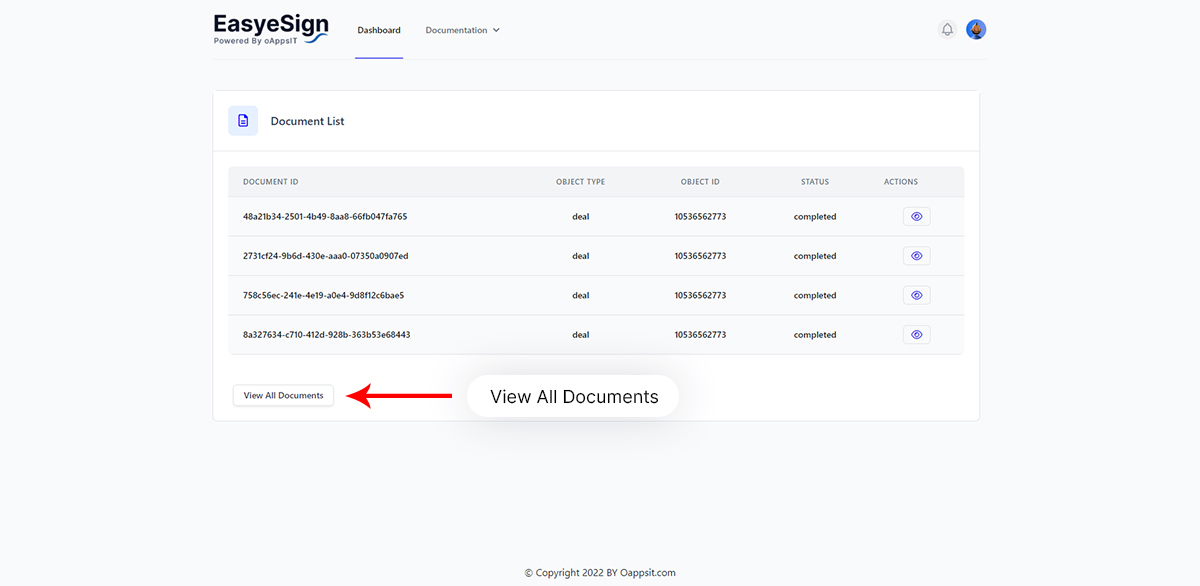
  • The dashboard shows your most recent documents along with their current status.
  • Dashboard
  • Click View All Documents to see the complete list of documents created using Easy eSign.
  • All-Documents

Document Statuses Explained

  • Draft: Document is created but not sent yet.
  • Sent: Document has been sent to the recipient.
  • Viewed: Recipient has opened the document.
  • Signed: All required parties have signed the document.
  • Completed: The signing process is fully completed.
  • Cancelled: The document was cancelled before completion.

Each document record also stores:

  • Which HubSpot record it was created from
  • Which template was used
  • Who the recipients were
  • When it was sent and signed

HubSpot

HubSpot CRM platform has all the tools you need for marketing, sales, content management, operations, and customer service. Each product in the platform is powerful alone, but the real magic happens when you use them together.

How to use Easy eSign in HubSpot

Once Easy eSign is installed and configured, it becomes available directly inside your HubSpot records such as Deals, Contacts, and Companies.

This allows your team to generate and send documents without leaving HubSpot.

One Typical Real-Life Workflow

  1. A sales rep opens a Deal in HubSpot
  2. Clicks Send Document from the Easy eSign card
  3. Selects a document template (for example: Sales Agreement)
  4. Selects the recipient (Contact associated with the Deal)
  5. Easy eSign automatically fills the document using HubSpot data
  6. Clicks Send
  7. The client receives the document and signs it
  • Step 1: Open HubSpot and go to Settings.
  • Step 2: Use Record Customization to add the Easy eSign card to the right sidebar of records.
  • Record-Customization
  • Step 3: Hover to the below of last card and you can see Add Card button click on it.
  • Hover Record-Customization
  • Step 4: Open Card Library and search for Easy eSign and click on + Add Card button.
  • Add-Card
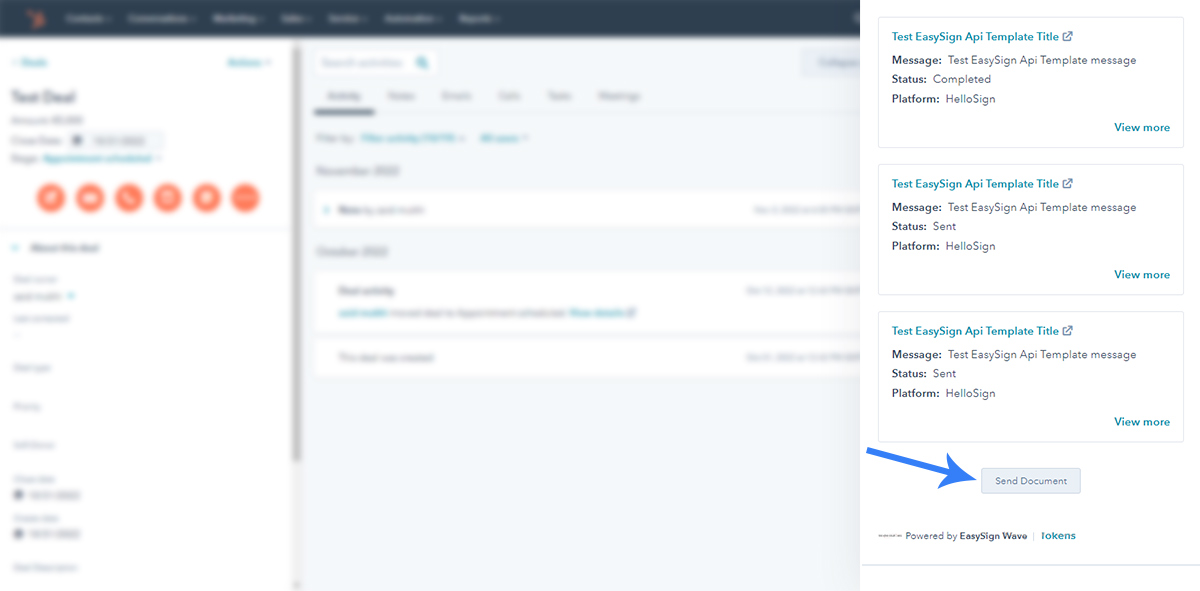
  • Step 5: Now open any Deal, Contact, or Company and you will see the Easy eSign card on the right side.
  • Send-Document
  • Step 6: For sending documents to the client, click on Send Document Button.
  • Hubspot-Document-Send
  • Step 7: Select the template and click on the selected template.
  • Document-Template-Select
  • Step 8: Select the recipient and click Next.
  • Select-Client
  • Step 9: Review the auto-filled document. You can:
    • Send it immediately
    • Or save it as a draft for later
  • Save-Sent-Document

Use of Properties (Tokens)

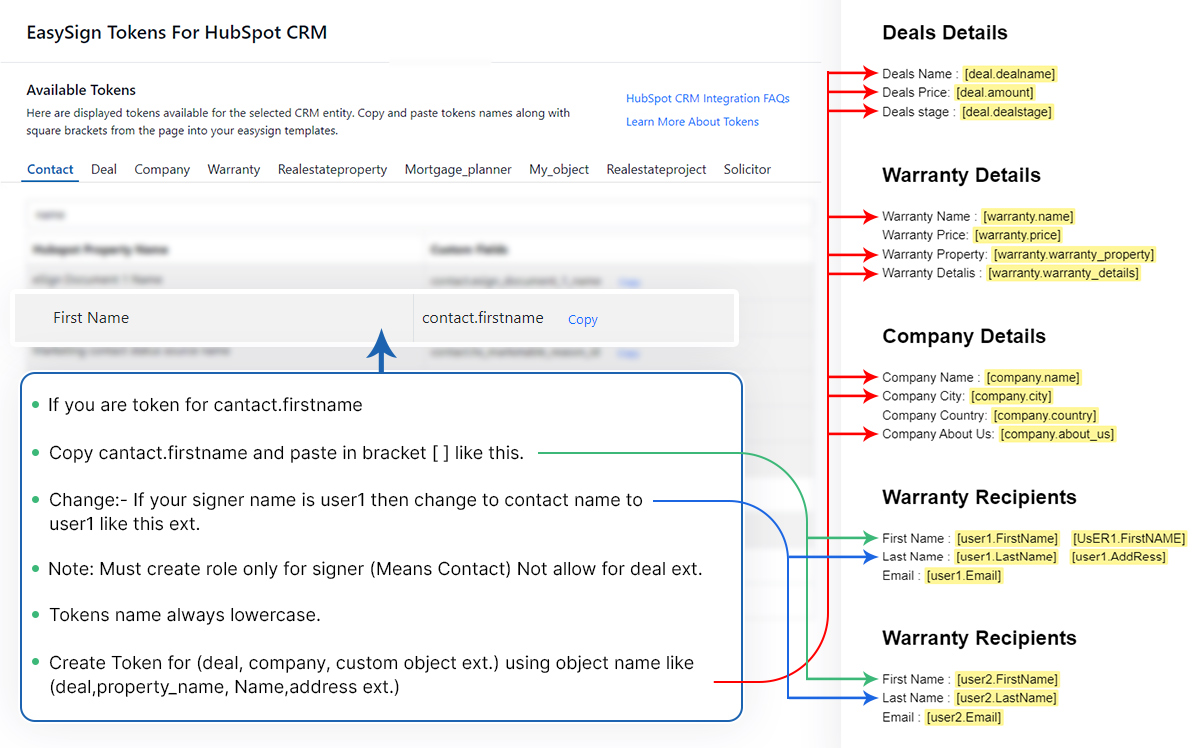
Easy eSign uses tokens to automatically insert HubSpot data into your document templates.

A token is a placeholder inside your document template that gets replaced with real data from HubSpot at the time the document is generated.

Example

If your HubSpot Deal has:

  • Deal Name = Website Redesign
  • Amount = $5,000

And your template contains:

deal.dealname
deal.amount

Easy eSign will automatically replace them with real values.

How to Copy Tokens from HubSpot

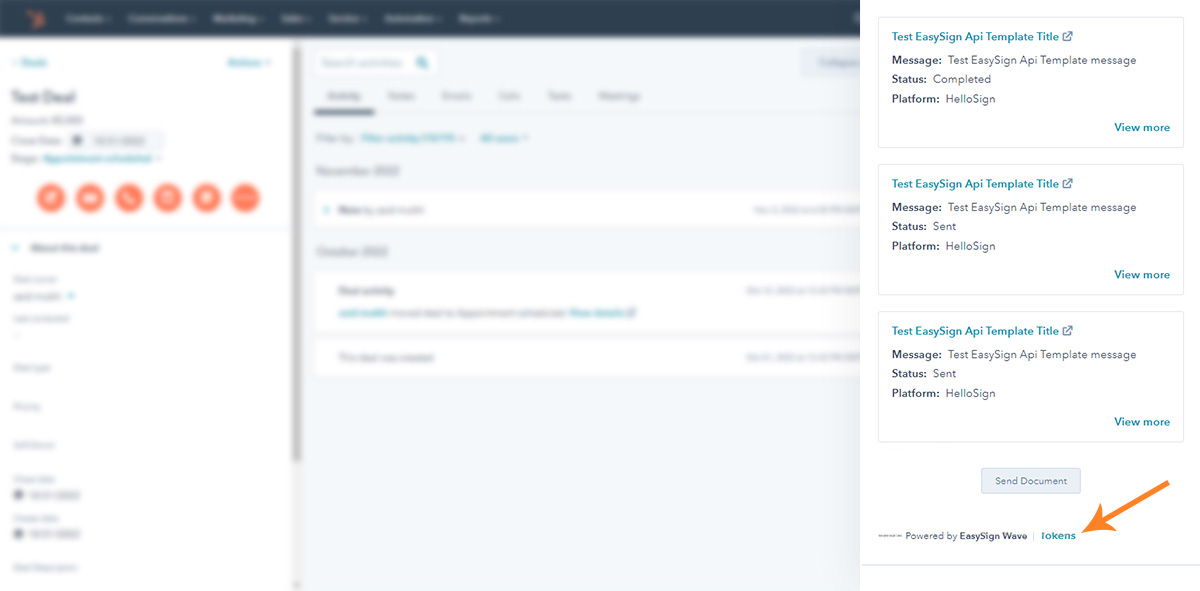
  • Open any record in HubSpot (Deal, Contact, Company, etc.)
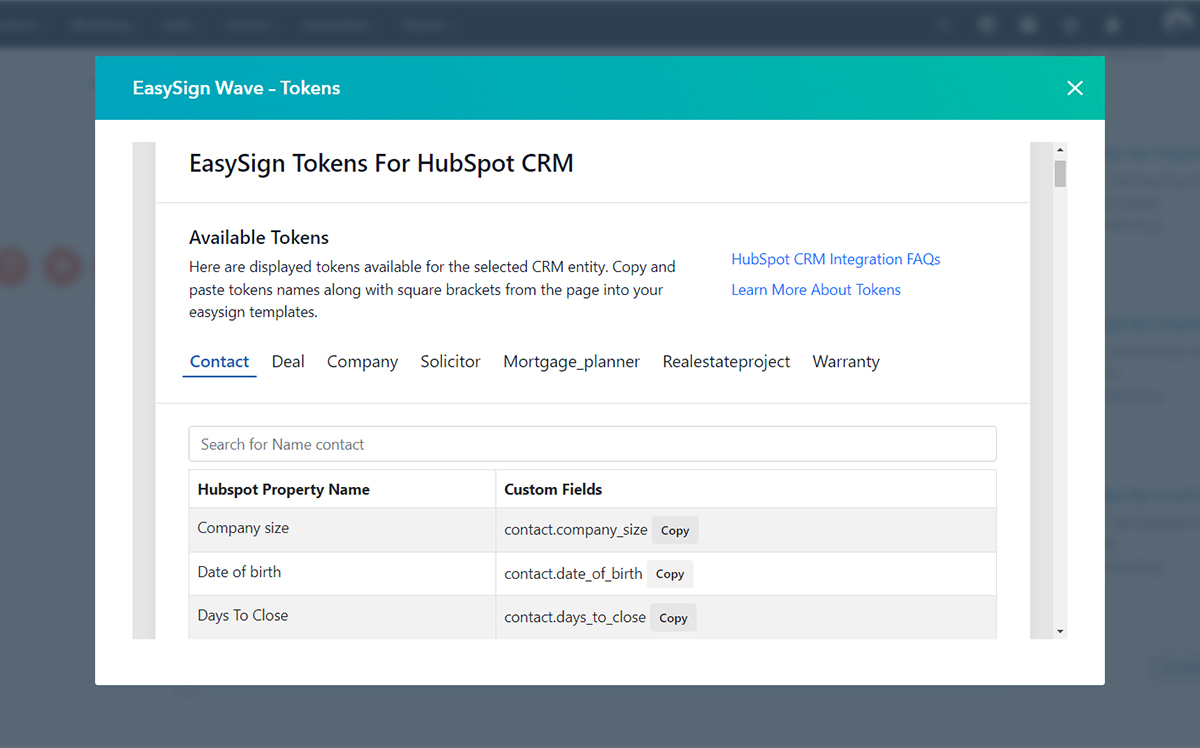
  • Click the Tokens button
Hubspot-Token-Open
  • Select the object (Deal, Contact, Company, Custom Object)
  • Copy the property token
  • Paste it into your document template
Tokens

Important Token Rules

  • Tokens are case-sensitive and must be in lowercase.
  • Property internal names must be used (not labels).
  • If a property is empty in HubSpot, the value in the document will also be empty.
  • If a token is written incorrectly, it will not be replaced.
  • Always test your template before using it in production.

Platform-specific usage:

PandaDoc

PandaDoc integration allows you to generate, send, and track documents directly from HubSpot using PandaDoc templates. Easy eSign automatically fills PandaDoc tokens using HubSpot data and manages the entire document lifecycle for you.

List of Features

  • Access all PandaDoc templates inside Easy eSign.
  • Automatically fill all tokens using HubSpot properties.
  • Support for HubSpot custom properties and custom objects.
  • Create documents using templates or files.
  • Send, cancel, and delete documents.
  • Automatically link documents to HubSpot records (such as Deals).
  • Real-time document status updates.

Get PandaDoc API Key

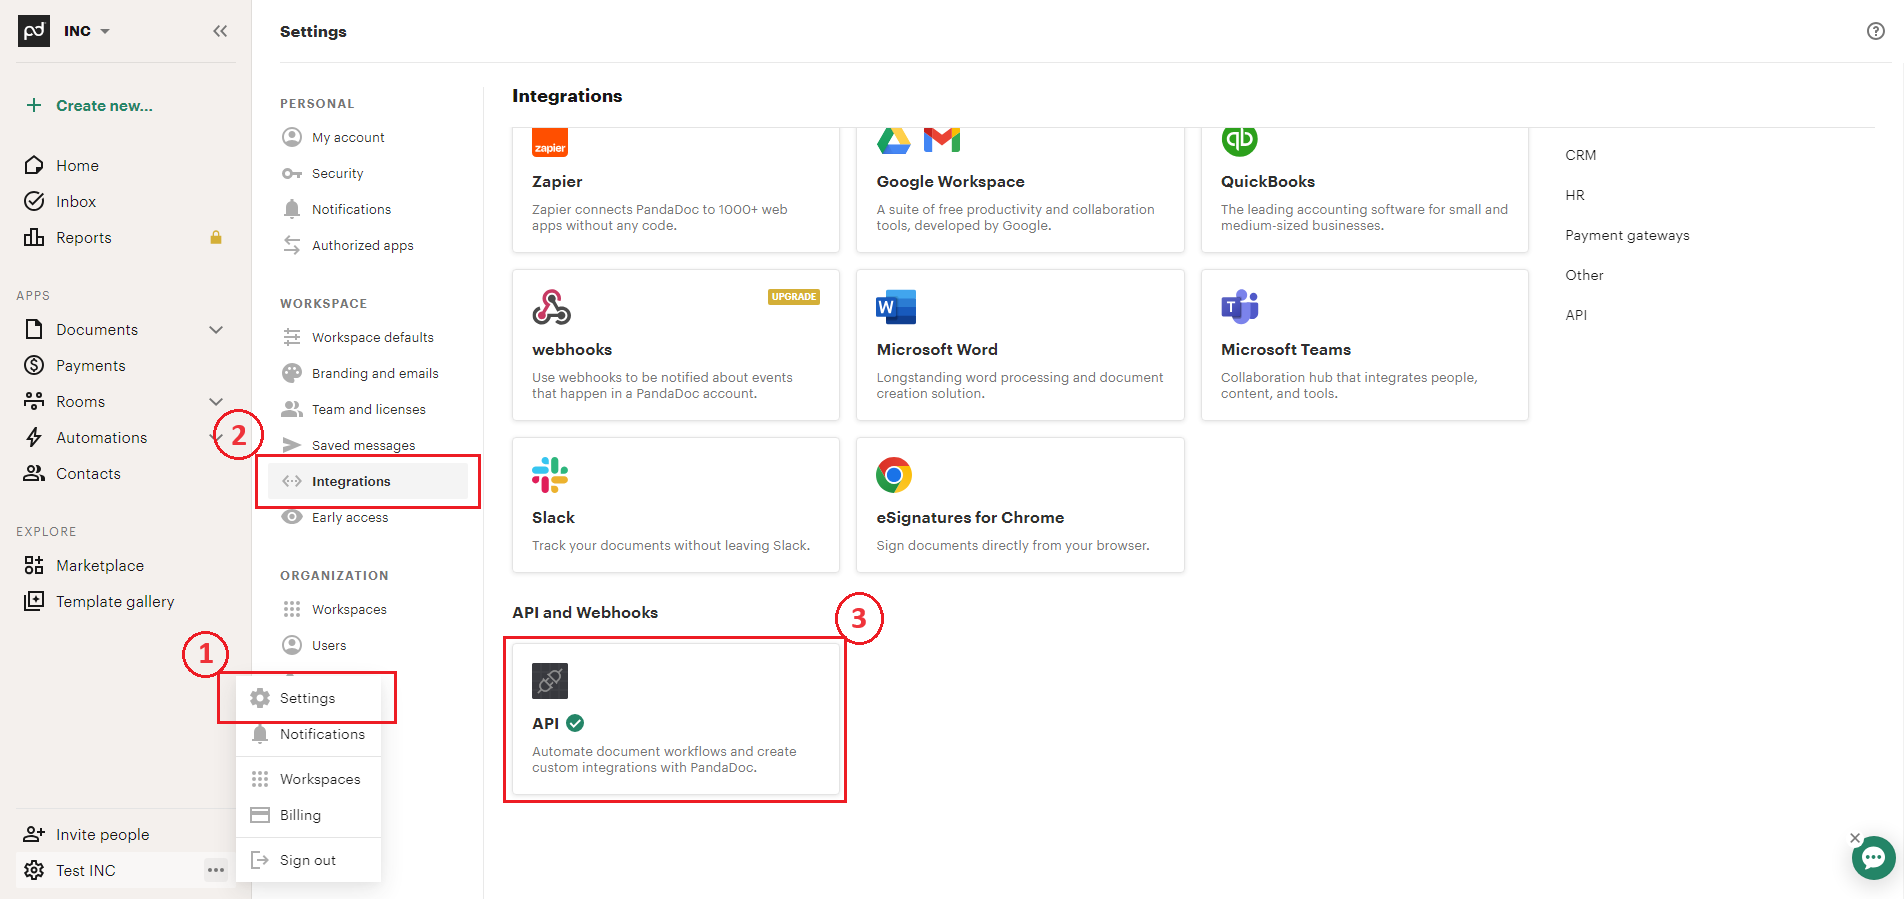
  • Create PandaDoc account and Go to PandaDoc Setting > Integration > API in your PandaDoc Account.
  • Pandadoc-New
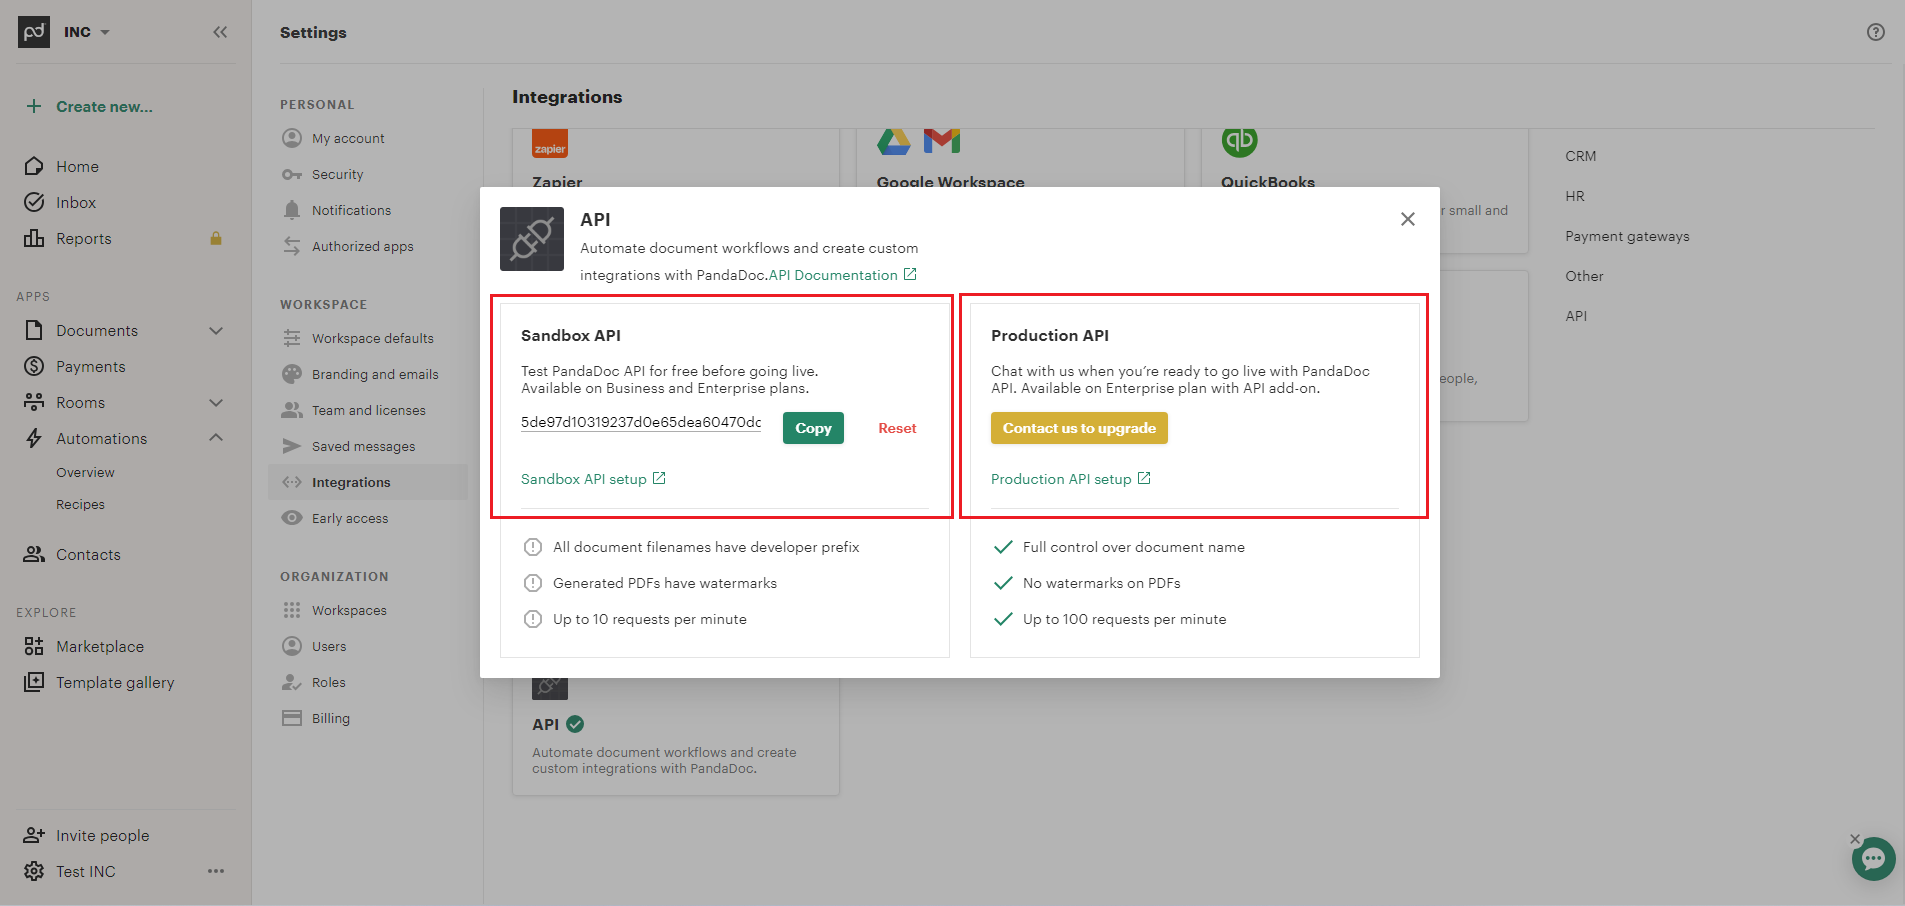
  • Click on API. In API pop-up, here you can create your API key(Sandbox/Production) for PandaDoc. Pandadoc_Api_Step

How to get PandaDoc ApiKey

Go to PandaDoc > Setting > Integration > Api (Please Visit Url here)

Use of PandaDoc Tokens

PandaDoc tokens are placeholders in your document template that Easy eSign replaces with HubSpot data when creating a document.

You must insert these tokens into your PandaDoc template exactly as provided by HubSpot.

Pandadoc-Set-Tokens

Token Naming Rules

  • For contact or signer fields: role.property (example: contact1.firstname)
  • For HubSpot object fields: object.property (example: deal.amount)
  • All tokens must be lowercase.
  • Role names must exactly match PandaDoc roles.

If a token does not get replaced, check:

  • Is the property filled in HubSpot?
  • Is the token name correct?
  • Is the role name correct?

How to Create PandaDoc Templates

  • Create signer roles first (for example: contact1, user1).
  • Insert tokens using the correct format:
    • contact1.firstname
    • deal.amount
  • Make sure all tokens and role names are lowercase.
  • Always test your template with a sample HubSpot record before using it in production.
Pandadoc-Tokens

Important Notes

  • Role create must in lowercase.
  • Please Role create only for signer and cc.
  • Please token name must in lowercase.
  • Please use of token name from our HubSpot Properties.

DocuSign

DocuSign integration allows you to generate, send, and track documents directly from HubSpot using DocuSign templates. Easy eSign automatically fills PreFill Text Fields using HubSpot data and manages the entire document lifecycle for you.

List of Features

  • Access all DocuSign templates inside Easy eSign.
  • Automatically fill all PreFill Text Fields using HubSpot properties.
  • Support for HubSpot custom properties and custom objects.
  • Create documents using templates or files.
  • Send, cancel, and delete documents.
  • Real-time document status updates.

Get DocuSign API Key

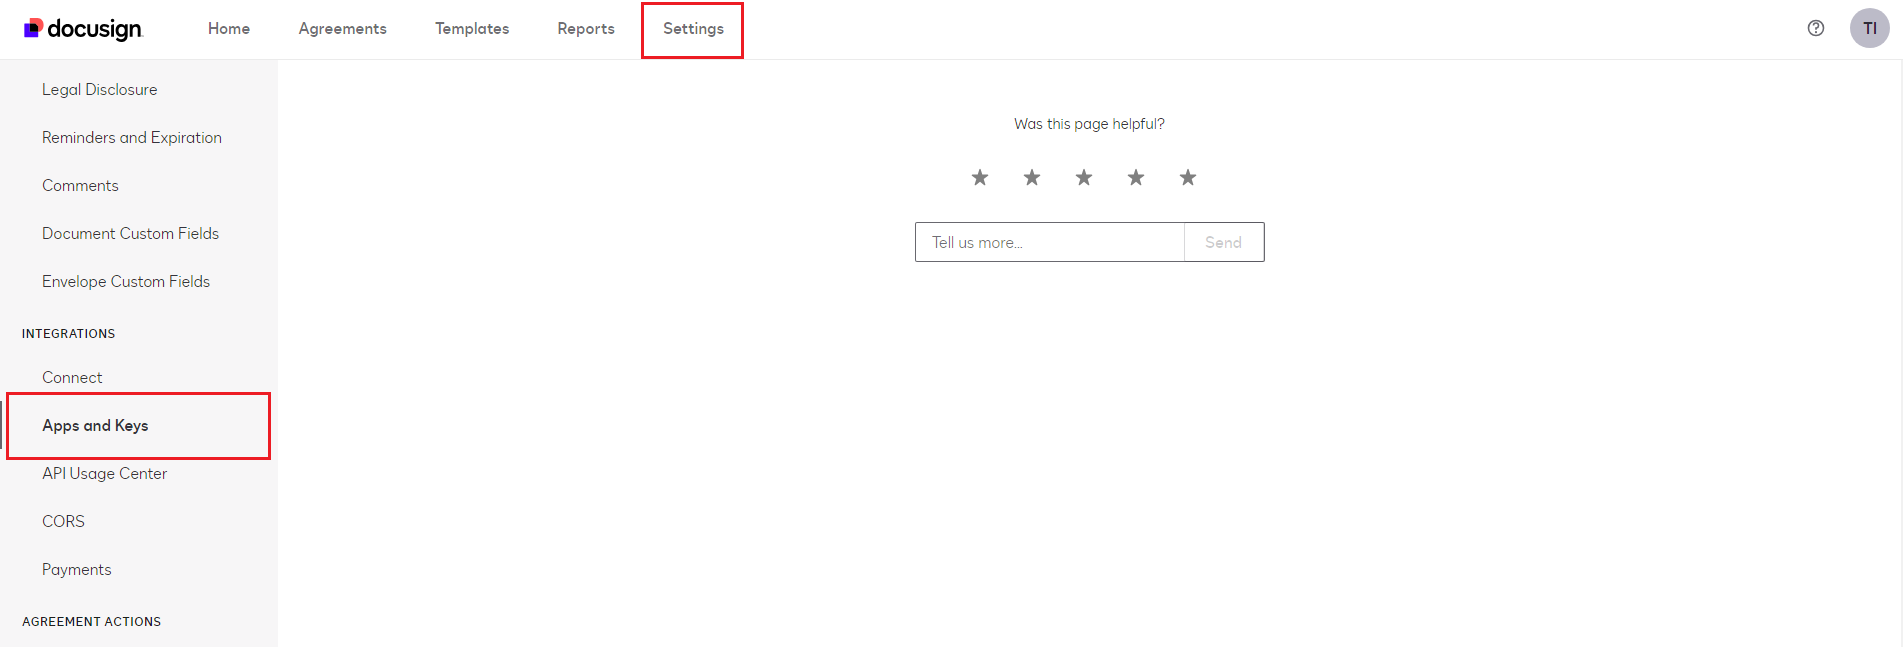
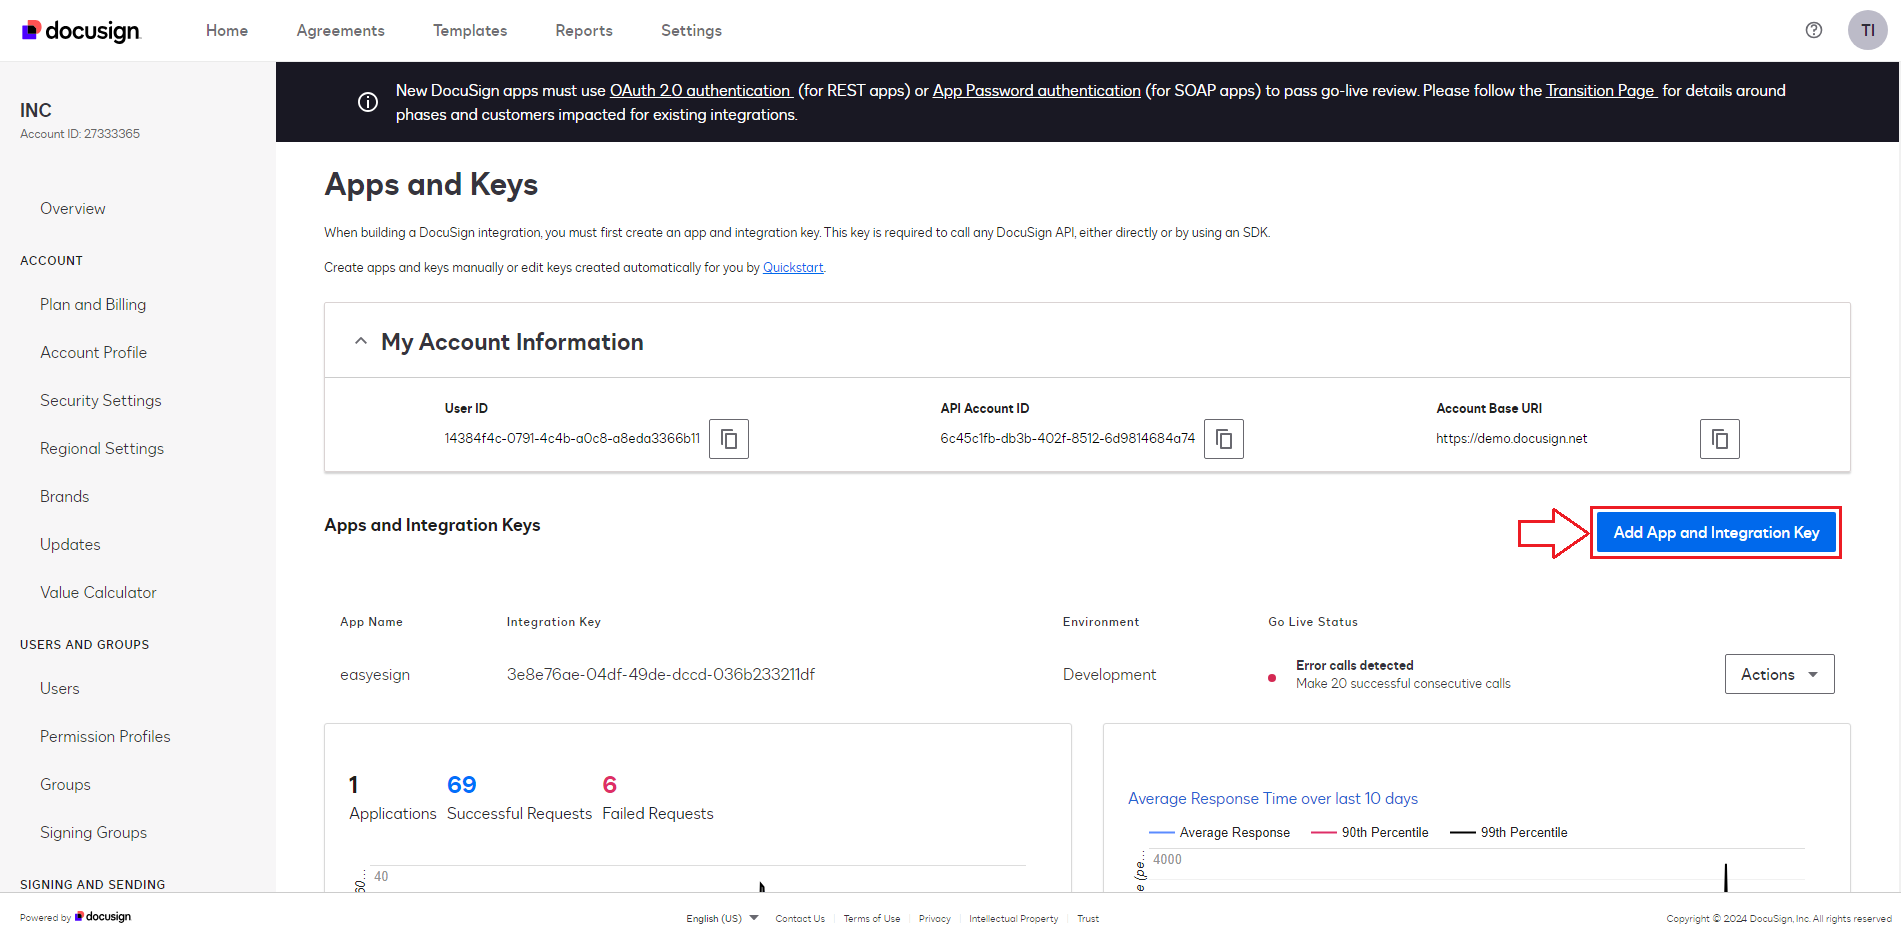
  • Create DocuSign Account and Go to DocuSign Inegration section's Admin > Apps and Keys. Docusign-New
  • Click on "Add App and Integration Key" button. Docusign Api Step
  • ENter App Name to the popup and click on "Create App" button. Docusign-Name-Popup
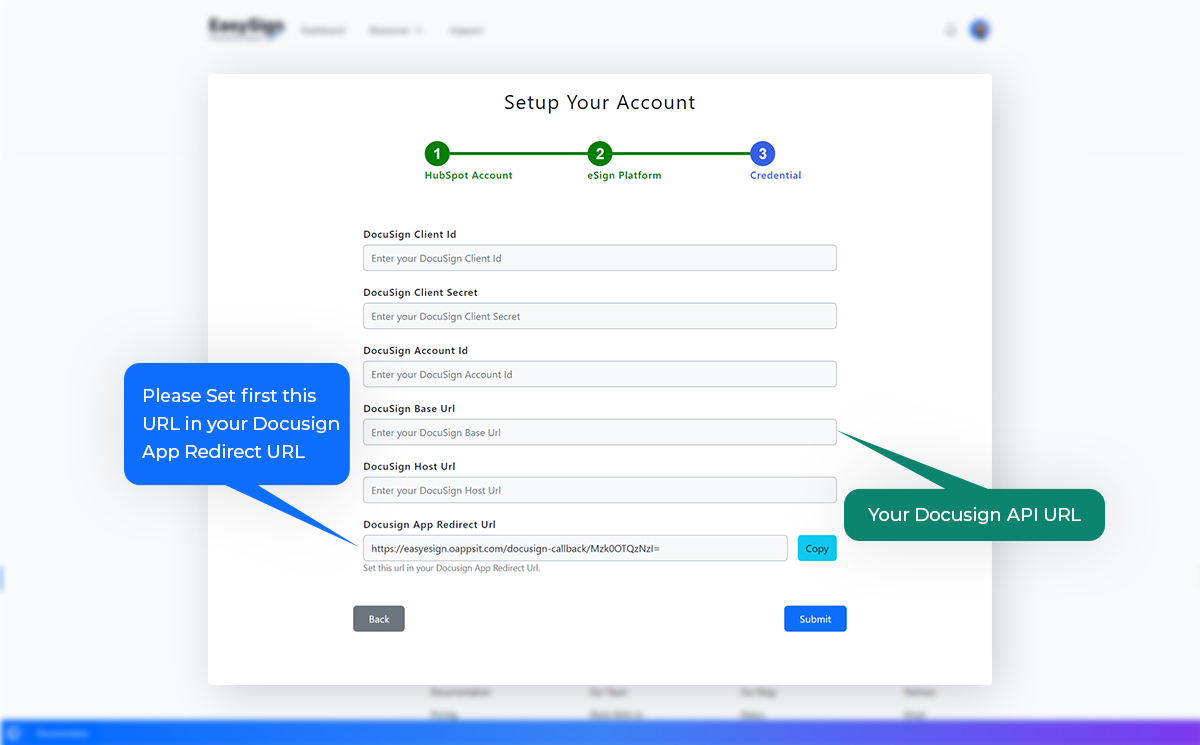
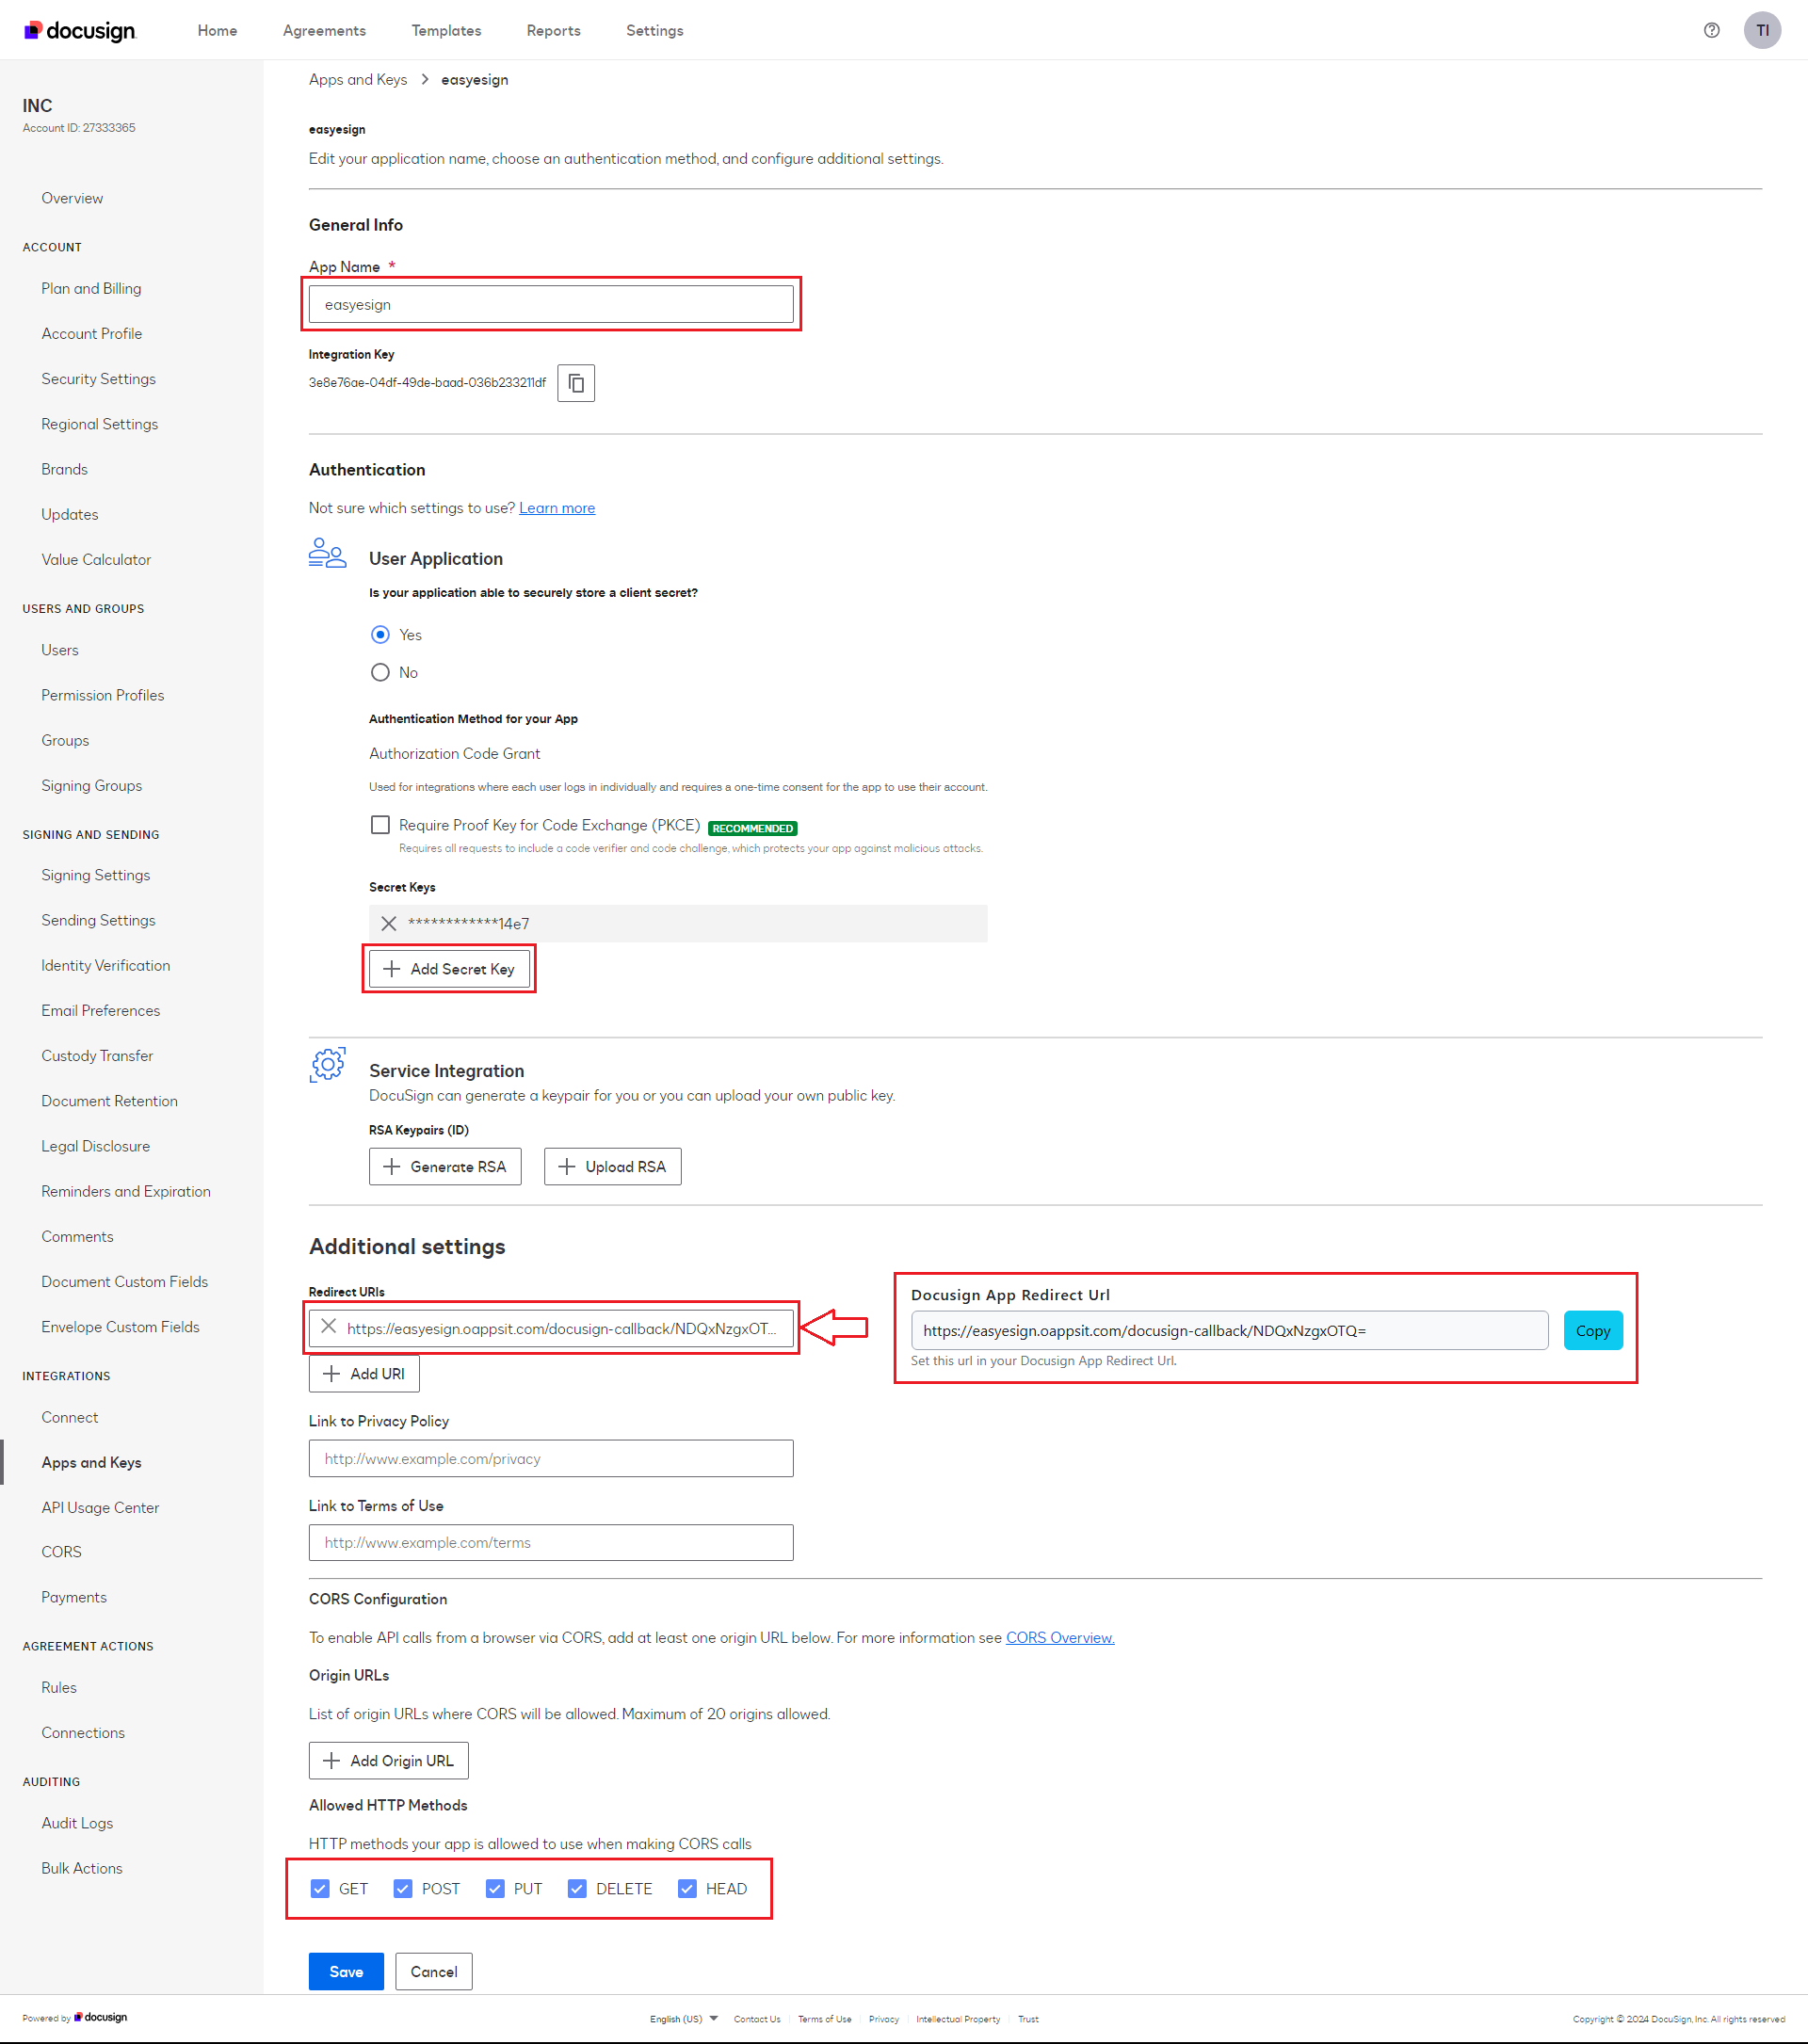
  • Select "Integration Type", and "Add Secret Keys", "Add Redirect URI" (redirect uri is in Easy eSign's DocuSign App Redirect Url), Check all Allowed HTTP method checkbox.
  • Copy Integration Key & Secret Keys to safe place latter we need this keys.
  • Docusing-New-App-Key

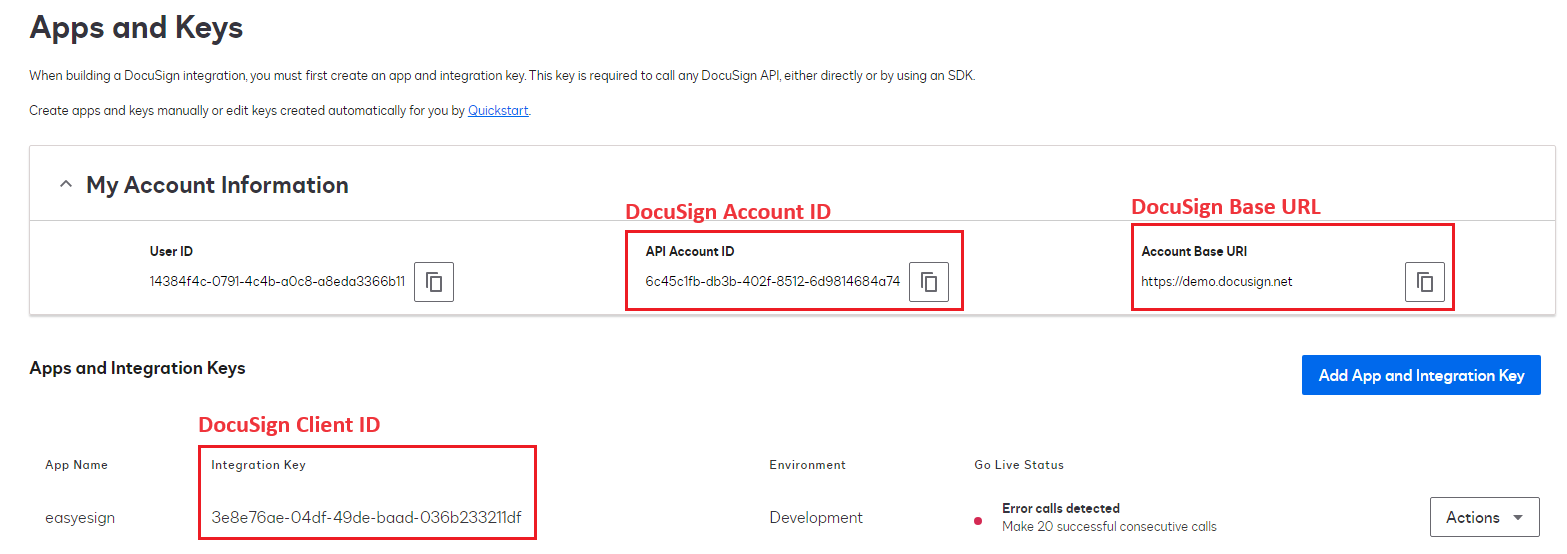
    DocuSign API Keys and URL

  • DocuSign Client ID = Integration Key
  • DocuSign Client Secret = Secret Keys
  • DocuSign Account ID = API Account ID
  • DocuSign Base URL = Account Base URI
  • DocuSign Host URL = Set DocuSign Host URL as per your API Account.
  • [DEVELOPMENT] https://account-d.docusign.com
  • [PRODUCTION] https://account.docusign.com
  • Docusign Api Step

How to get DocuSign Credential

Go to DocuSign > Setting > Apps and Keys (Please Visit Url here)

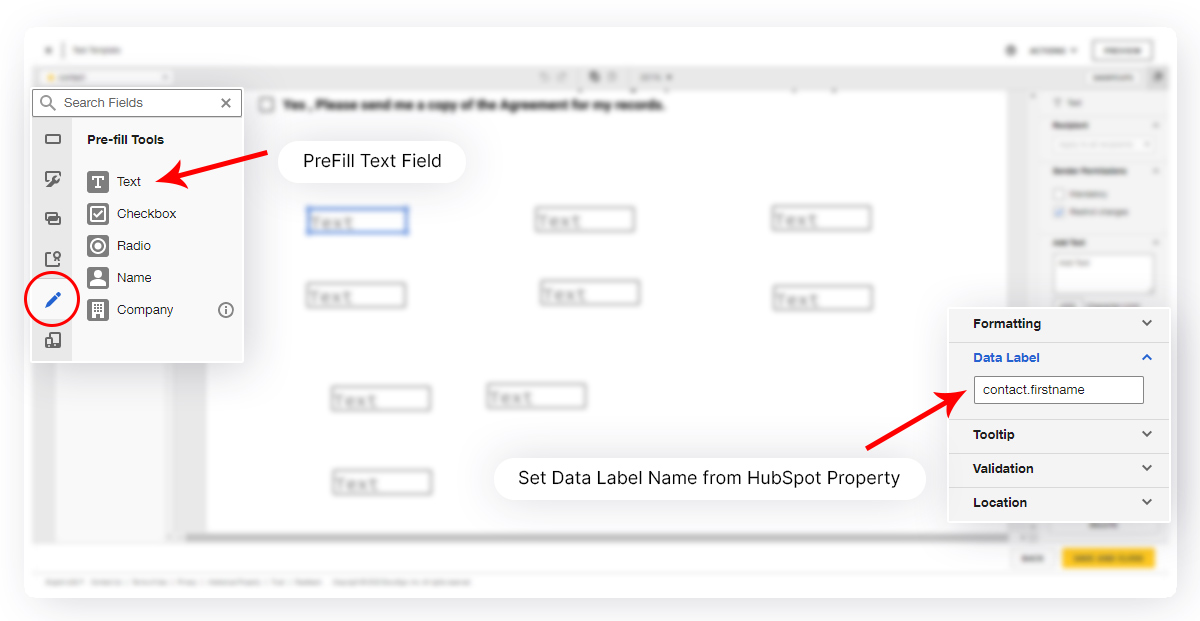
Use of PreFill Text Fields

DocuSign uses PreFill Text Fields to insert data automatically into your documents. Easy eSign fills these fields using HubSpot properties.

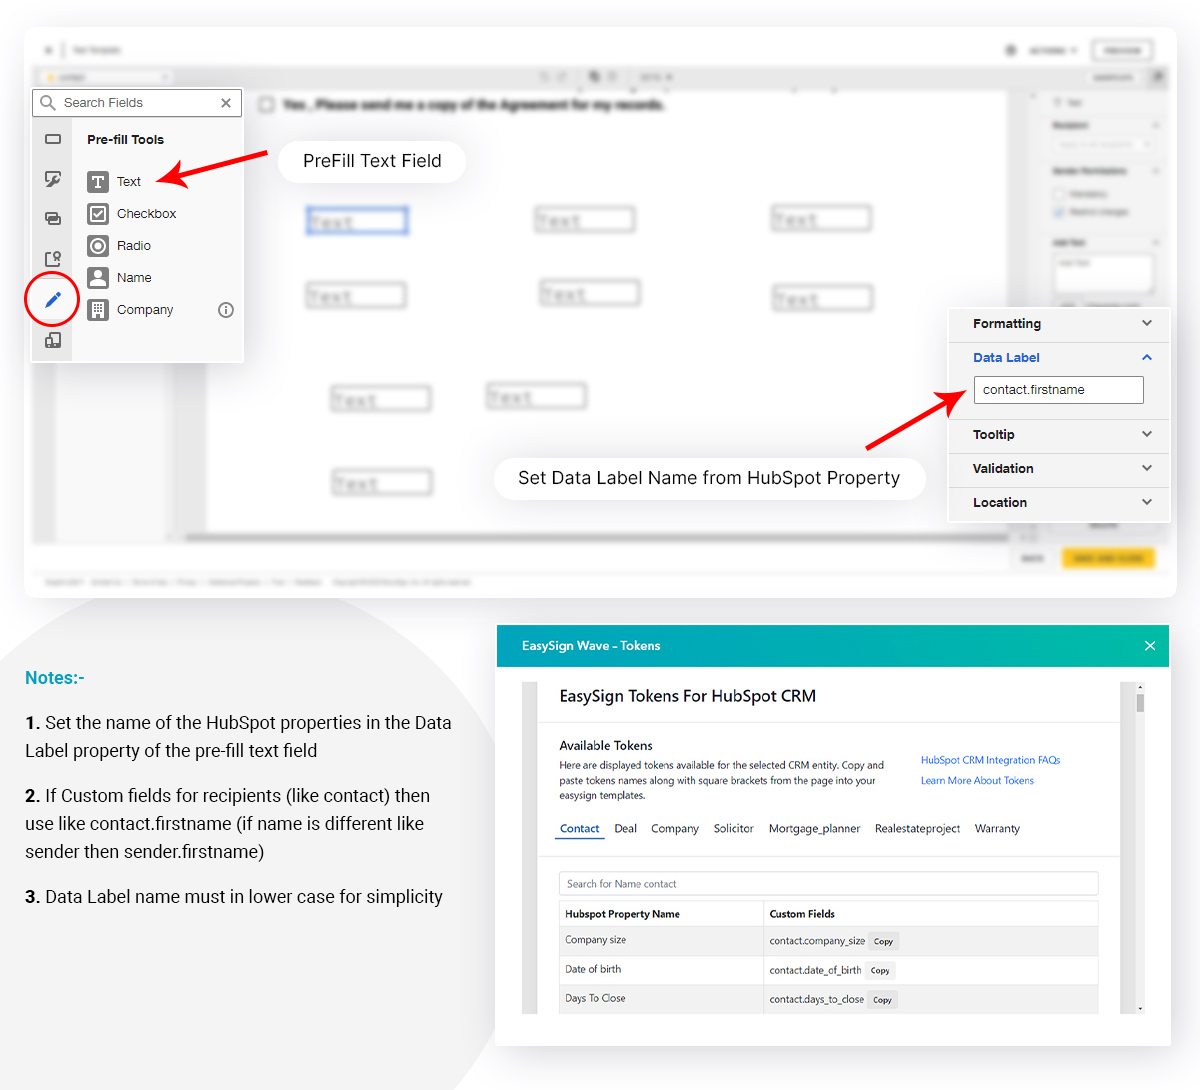
You must name your PreFill Text Fields exactly the same as your HubSpot property tokens.

Docusign Templates Tokens

Field Naming Rules

  • For signer fields: contact1.firstname
  • For HubSpot object fields: deal.amount
  • All names must be lowercase.
  • Field names must exactly match HubSpot tokens.

If a field is not being filled, check:

  • Is the HubSpot property filled?
  • Is the field name correct?
  • Is the field spelled exactly the same?

How to Create Template

  • Please create first signer for contacts
  • if you create PreFill Text fields for signer then use role_name.property_name like (contact1.firstname , user1.firstname)
  • if you create PreFill Text fields for HubSpot object (without contact) then use object_name.property_name (deal.dealname,company.name ext..)
  • Please check always created PreFill Text fields has been PreFill Text fields like this image Docusign Templates

Important Notes

  • Role create must in lowercase.
  • Please Role create only for signer and cc.
  • Please PreFill Text fields name must in lowercase.
  • Please use of PreFill Text name from our HubSpot Properties.

HelloSign / Dropbox Sign Coming Soon

HelloSign (Dropbox Sign) integration will allow you to generate, send, and track documents directly from HubSpot using HelloSign templates. Easy eSign will automatically fill custom fields using HubSpot data.

Planned Features

  • Access HelloSign templates inside Easy eSign.
  • Automatic filling of custom fields using HubSpot properties.
  • Support for HubSpot custom properties and custom objects.
  • Create documents using templates or files.
  • Send, cancel, and track documents.
  • Real-time document status updates.

Get Hellosign API Key

How to get HelloSign Credential

Go to HelloSign > Integration > Api (Please Visit Url here)

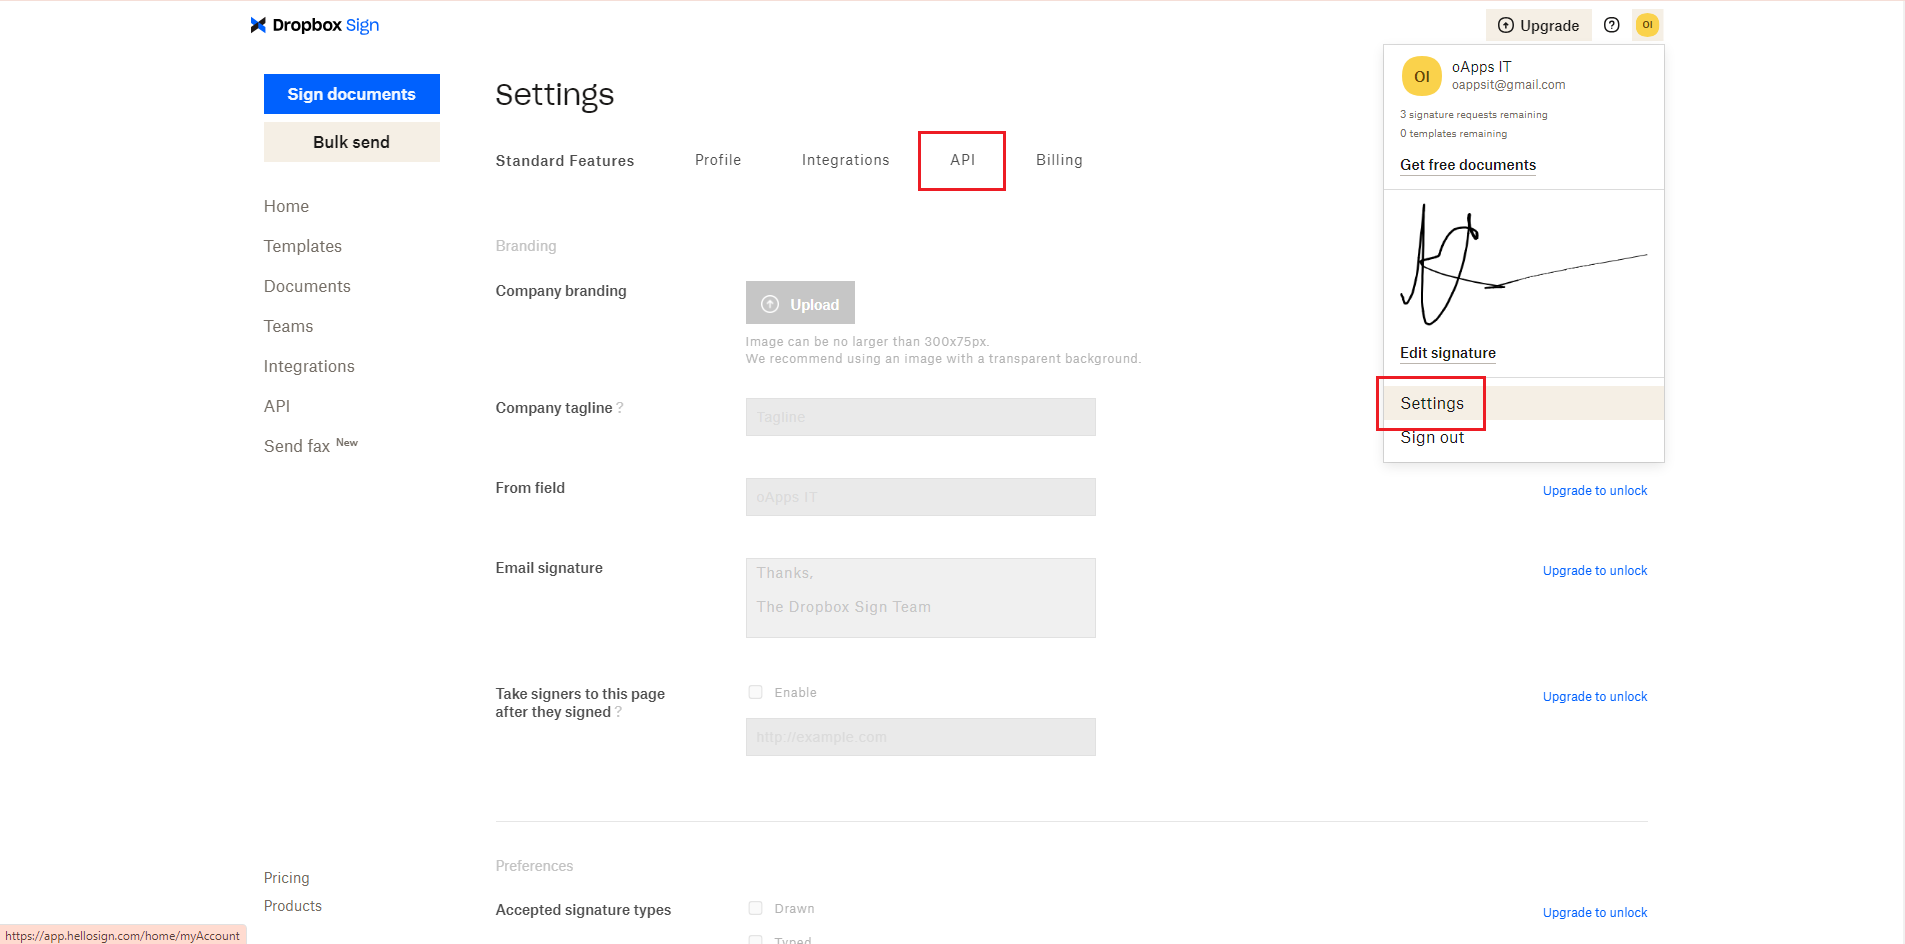
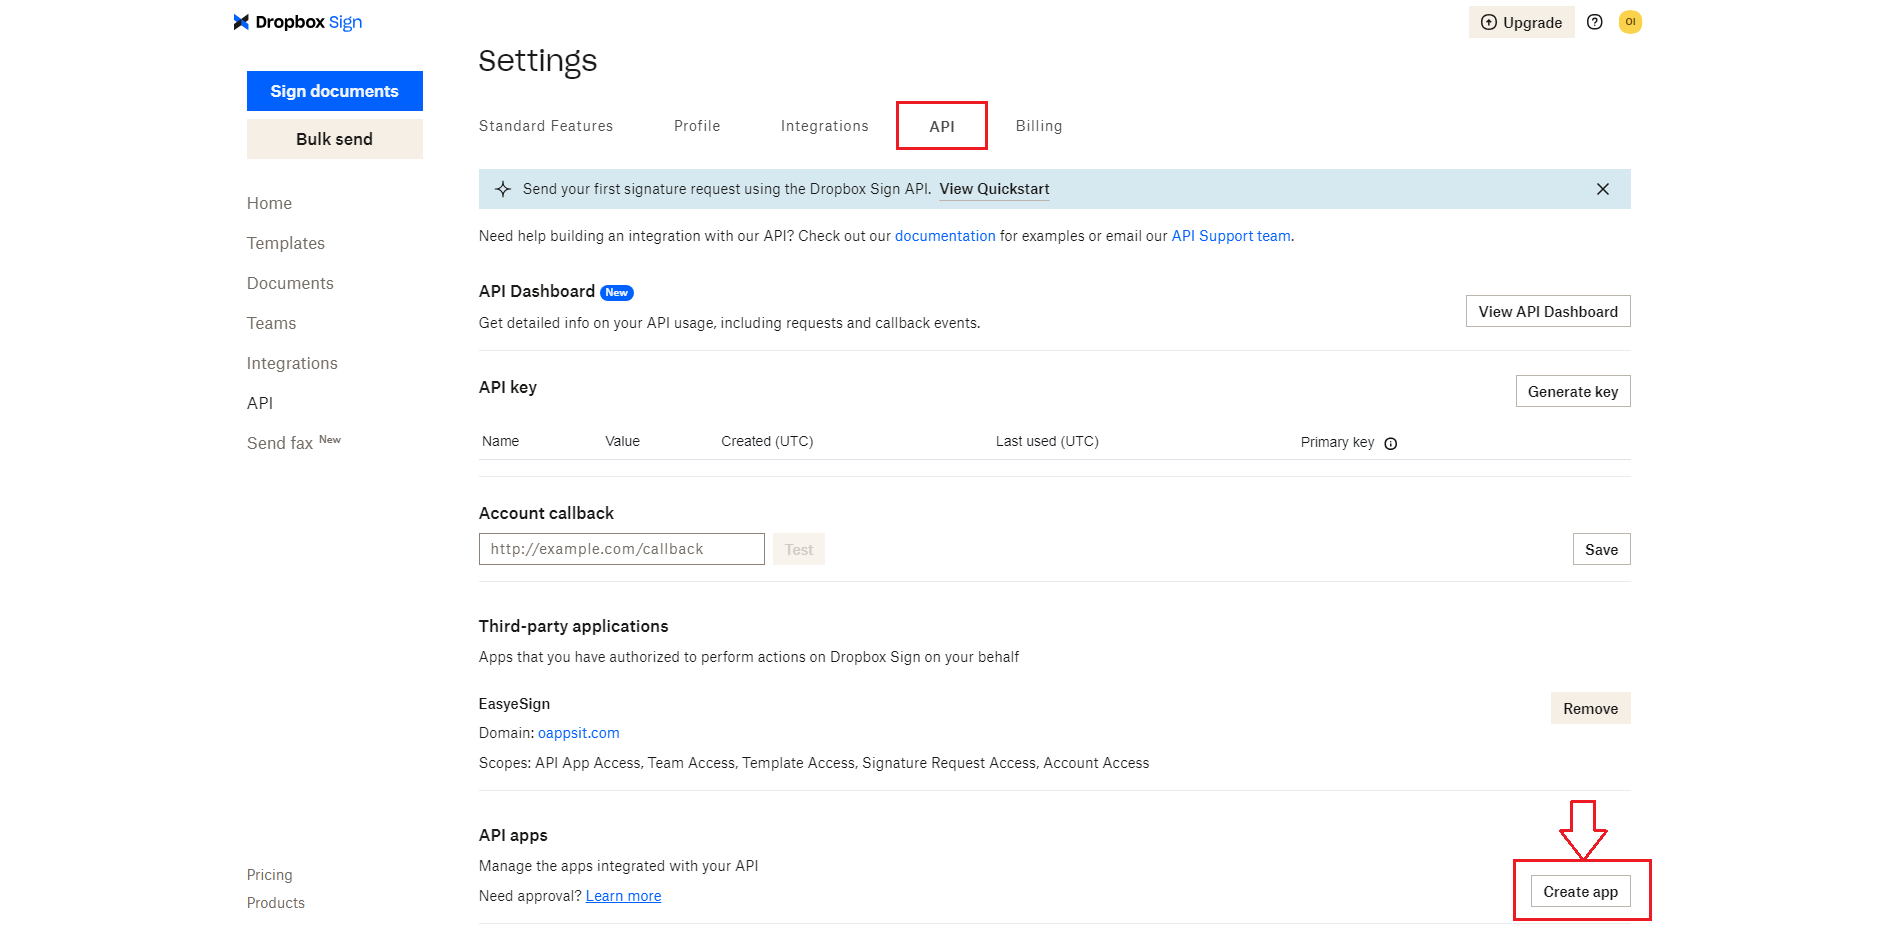
  • Create Hellosign account and Go to Hellosign Settings > API Hellosign api Step 1
  • In API setting page > Click on "Create App" button in API apps section Hellosign api Step 2
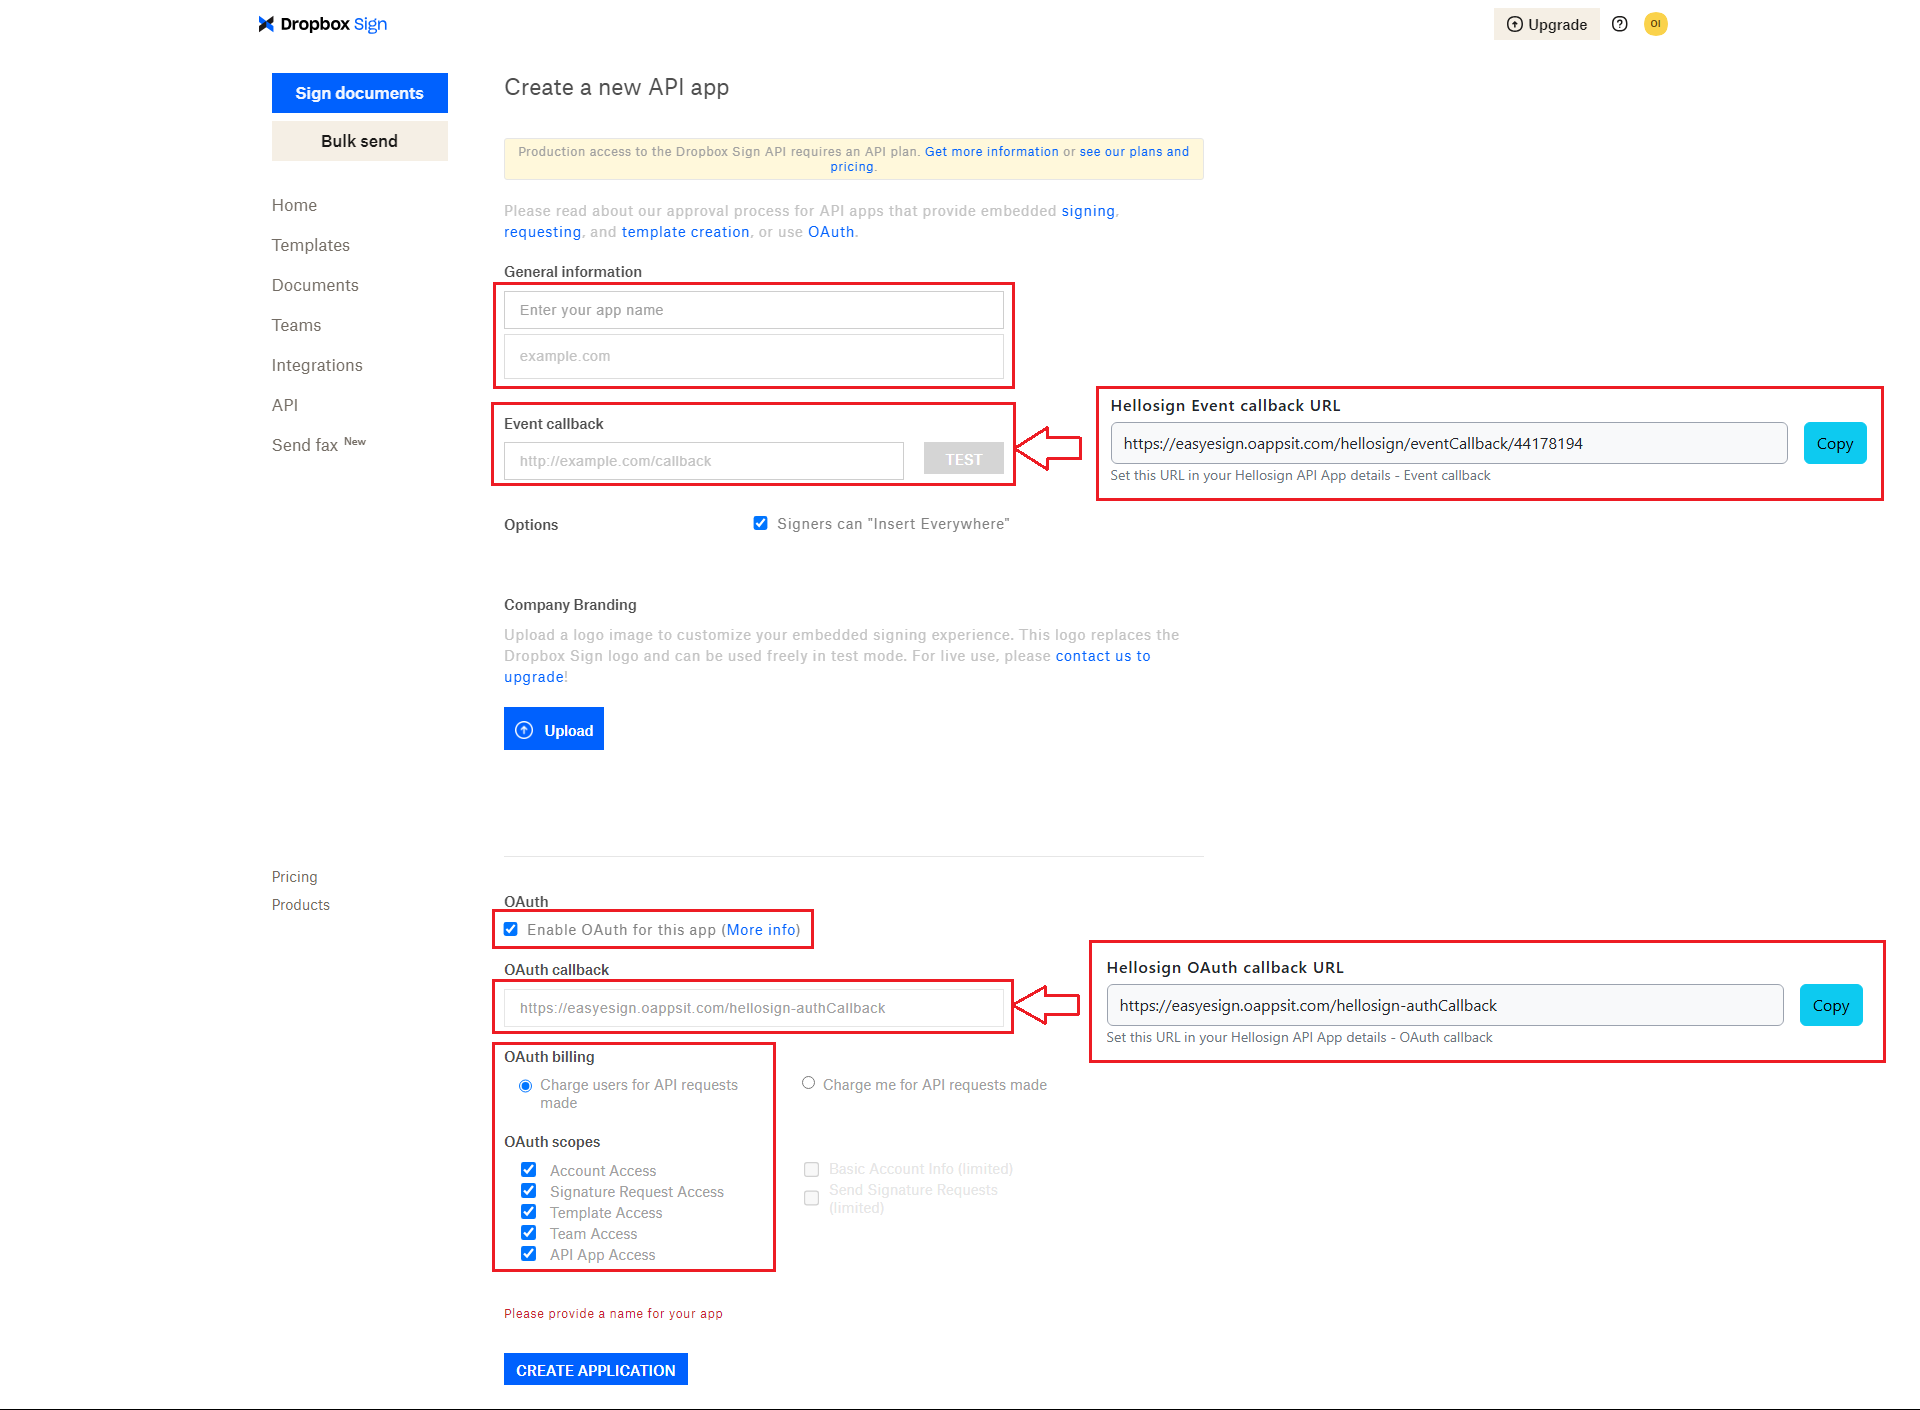
  • In Create App page > Fill required information & Create App Hellosign api Step 3
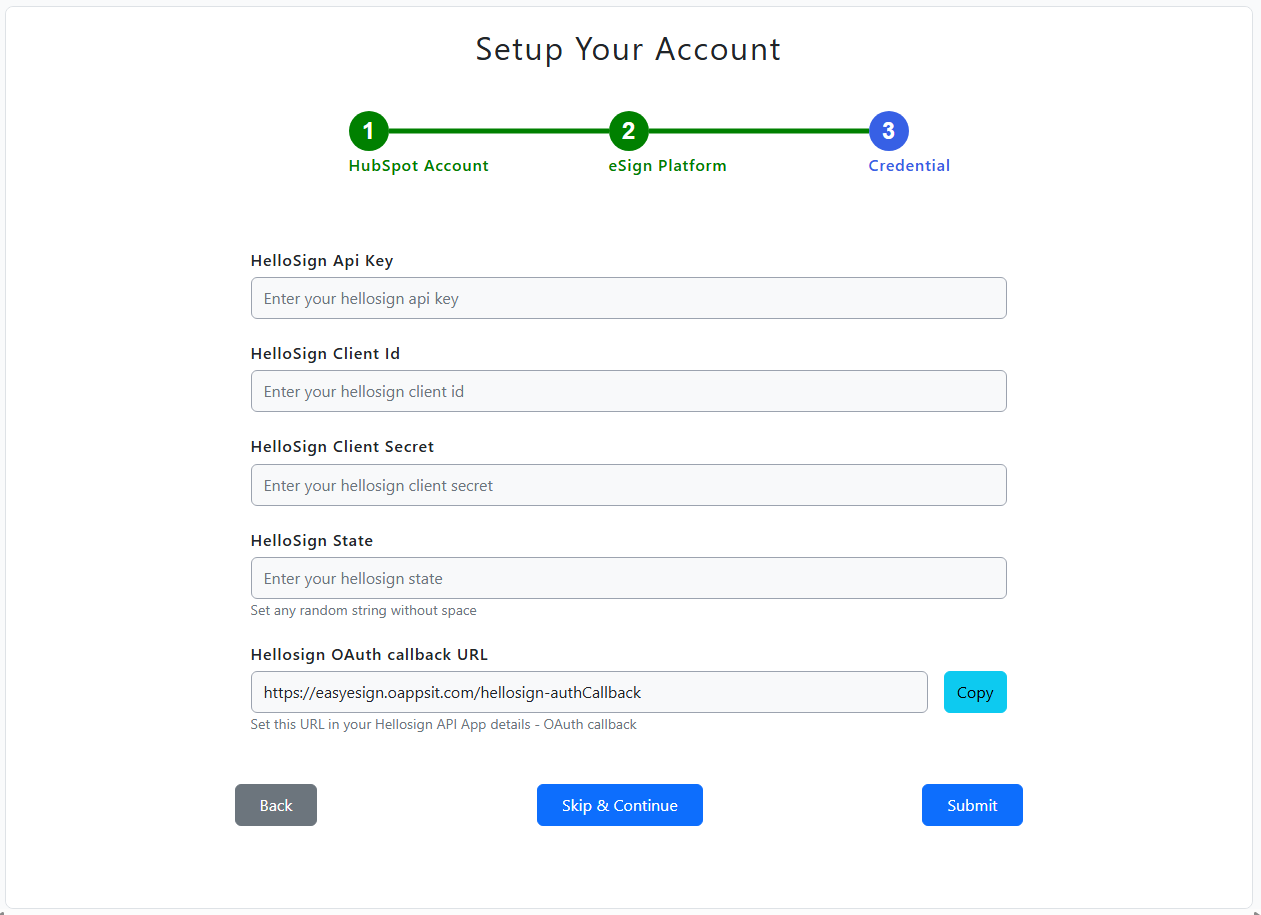
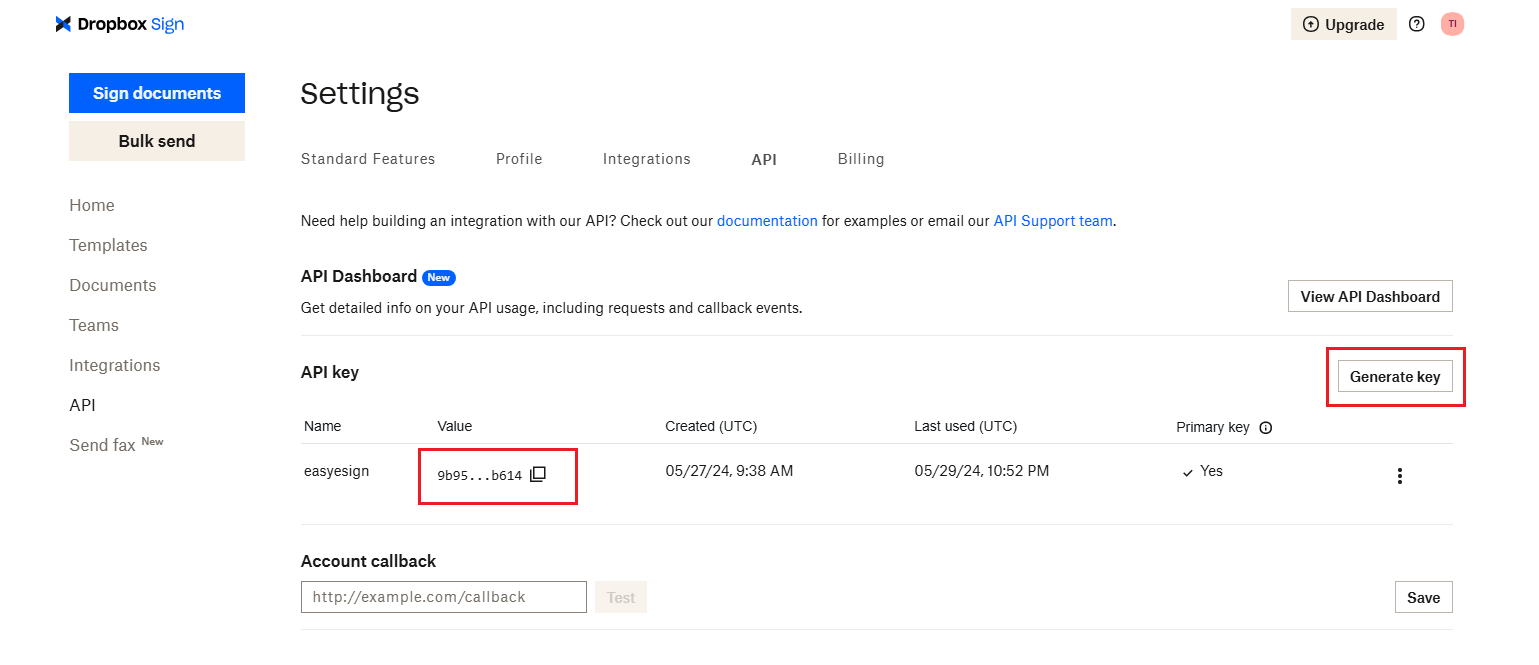
  • Generate API Key & Get API Key Hellosign api Step 4
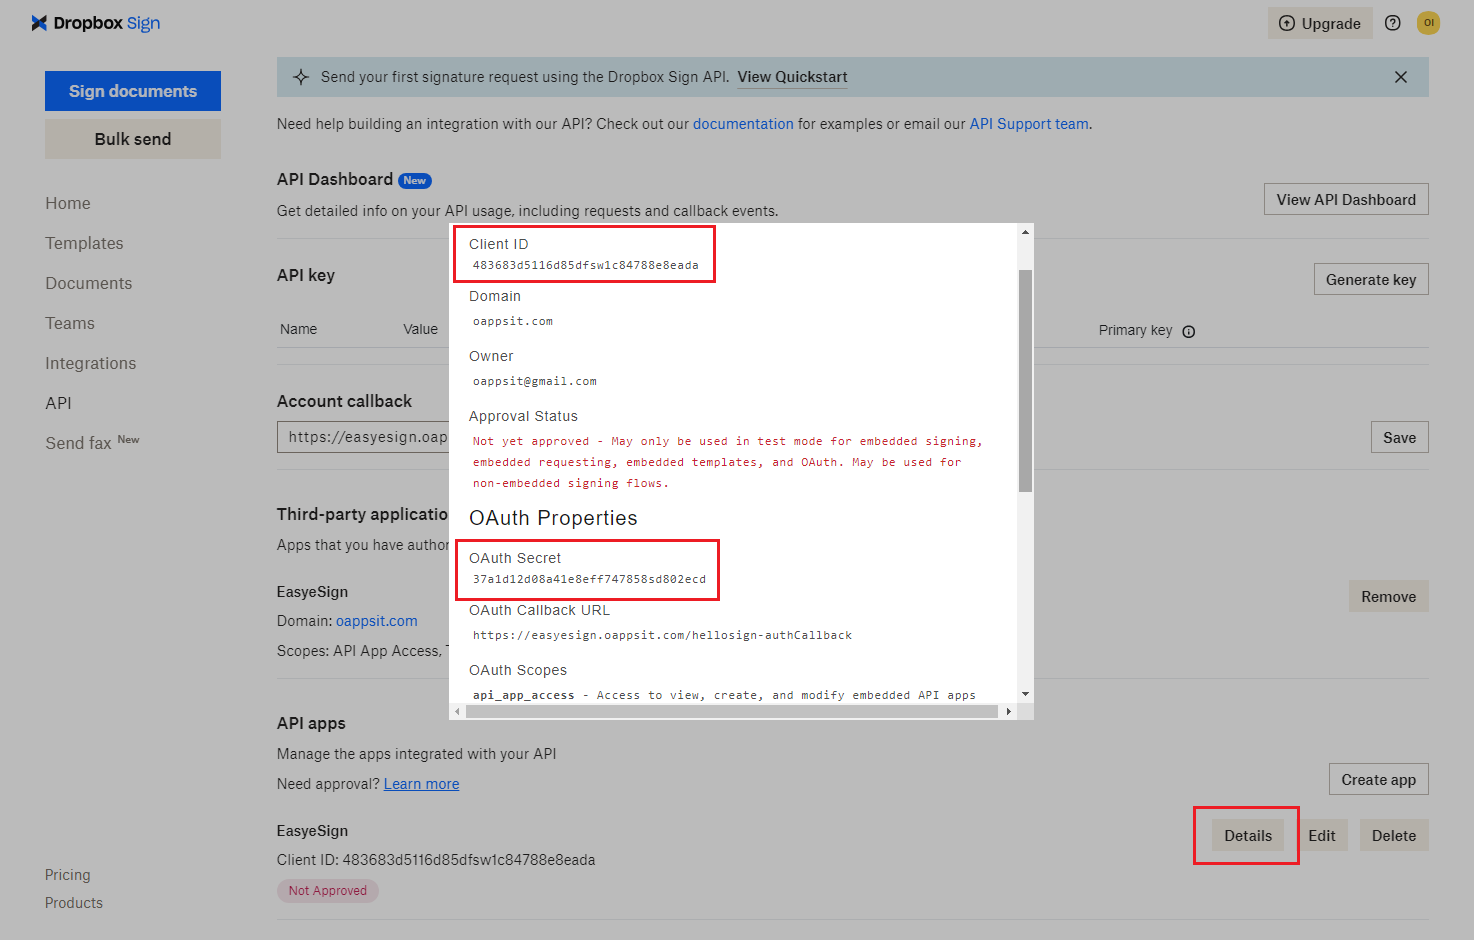
  • Get Client ID & Client Secret Hellosign api Step 5

How to get HelloSign Credential

Go to HelloSign > Integration > Api (Please Visit Url here)

Use of Custom Fields

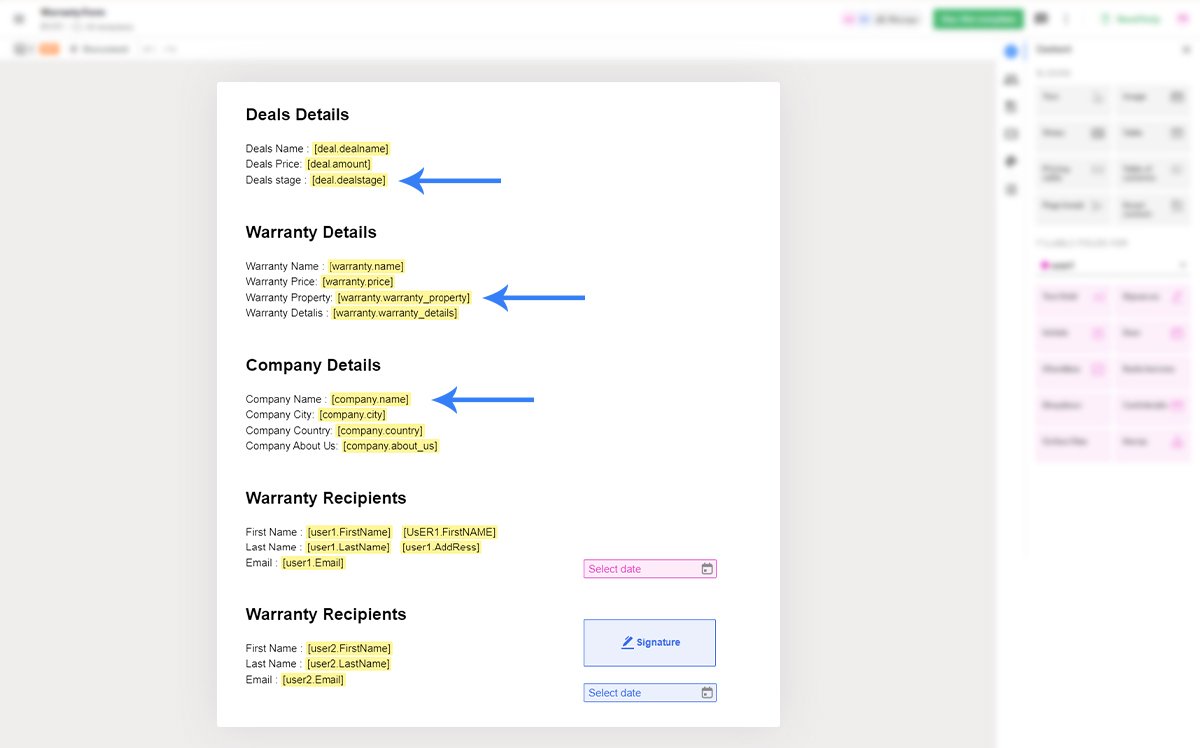
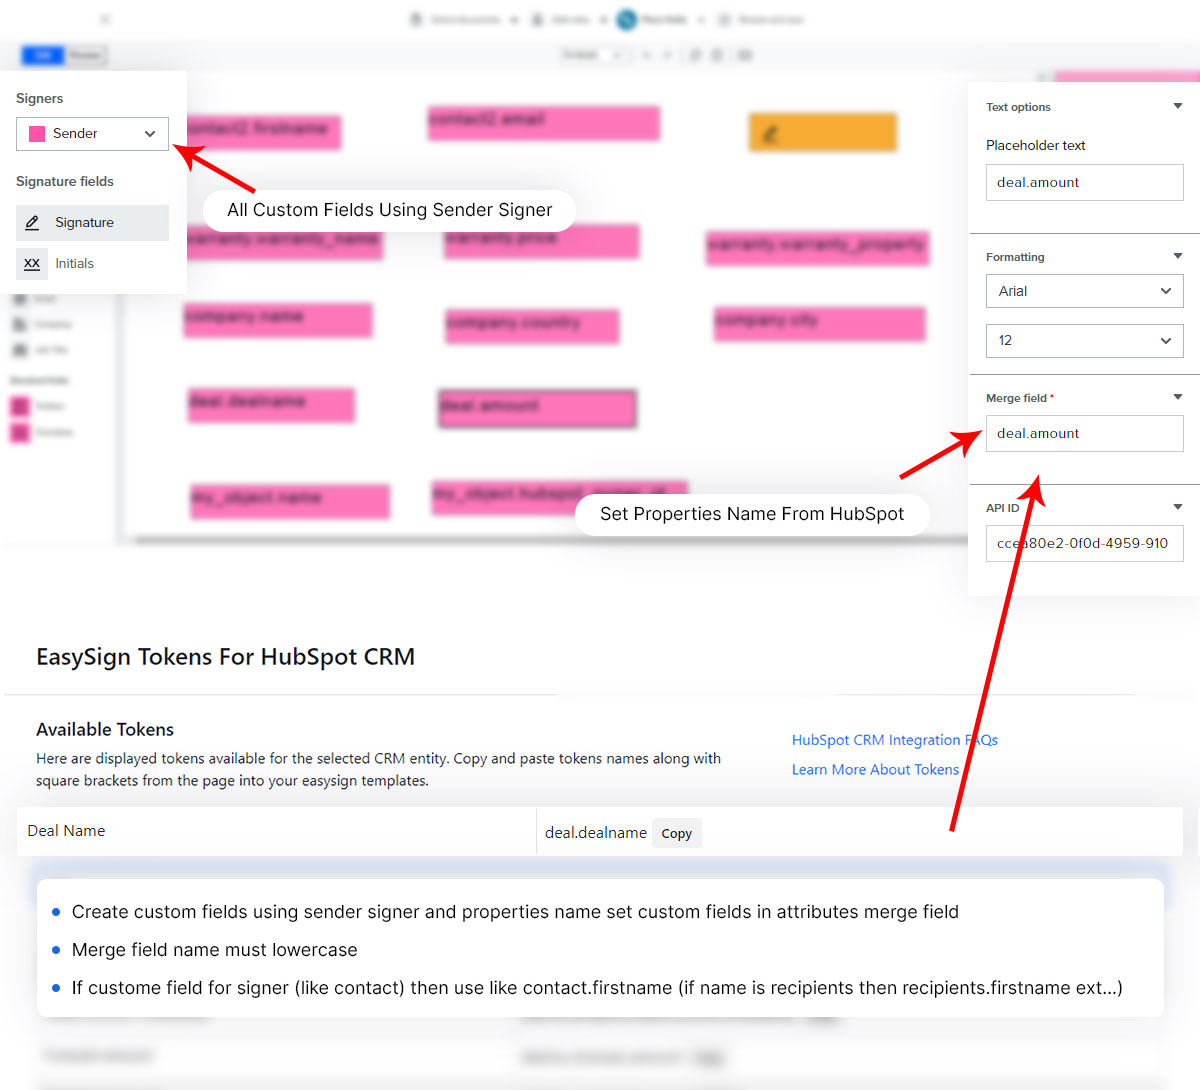
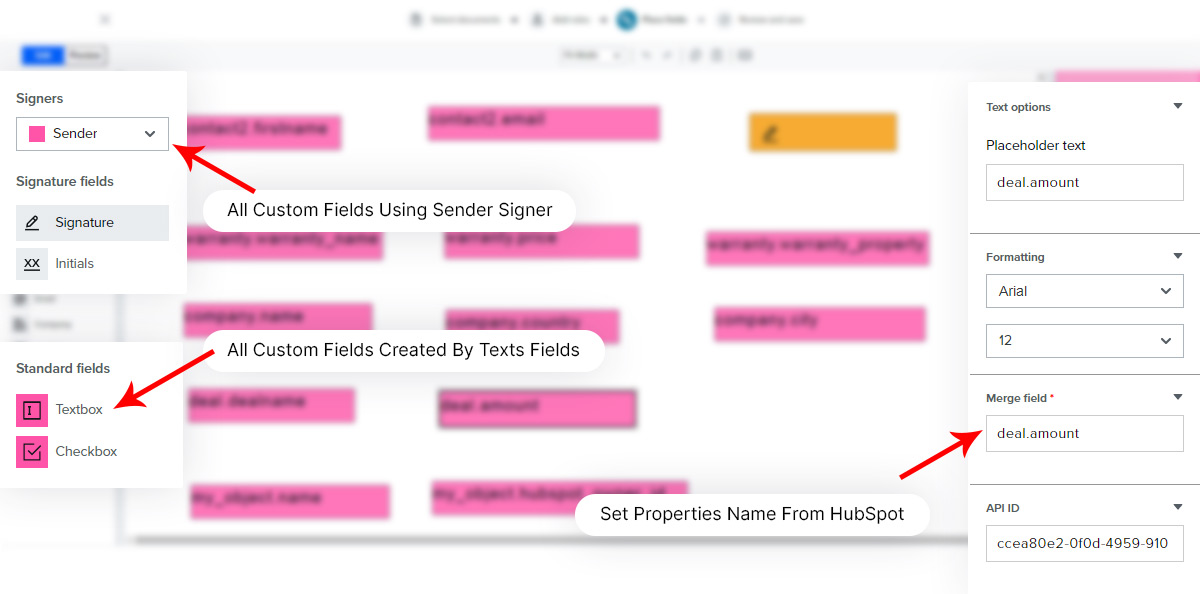
Please check image

Set-Token-Details

If you more details for Custom Fields then watch this video Click here

How to Create Template

  • Please create first signer for contacts
  • The length of the custom field property should be proper for the content of the property.
  • Custom fields create by Sender Signer Text fields
  • if you create Custom fields for signer then use role_name.property_name like (contact1.firstname , user1.firstname)
  • if you create Custom fields for HubSpot object (without contact) then use object_name.property_name (deal.dealname,company.name ext..)
  • Please check always created custom fields has been custom fields like this image Hellosign-Set-Customfields

Important Notes

  • Role create must in lowercase.
  • Please Role create only for signer and cc.
  • Please custom fields name must in lowercase.
  • Please use of custom fields name from our HubSpot Properties.

Troubleshooting & Best Practices

Common Issues

  • Token not replaced: Check property value, token name, and case sensitivity.
  • Document not sending: Check API credentials and integration status.
  • Easy eSign card not visible in HubSpot: Check Record Customization settings.
  • Wrong data in document: Check which HubSpot record you started from.

Best Practices

  • Always test templates before using them in production.
  • Use sandbox/test accounts for DocuSign and PandaDoc first.
  • Keep token names simple and consistent.
  • Always fill required properties in HubSpot before sending documents.
  • Do not rename tokens or fields after templates are in use.